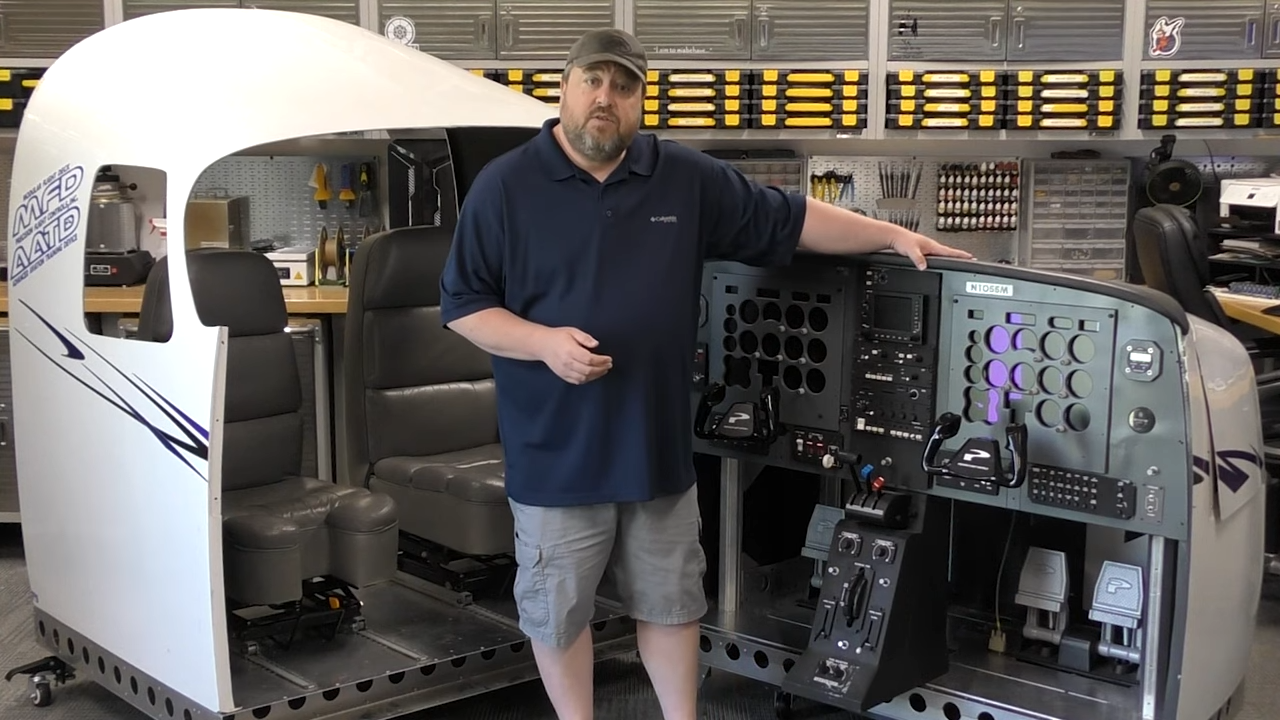
A professional flight simulator can look like the ultimate auction bargain: two cockpit seats, real controls, an imposing instrument panel, a motion base, and enough wiring to frighten a licensed electrician. Then comes the awkward discovery that the computers are missing, several instruments have been modified, and the documentation apparently departed on an earlier flight.
That is roughly the challenge facing the team behind Angry Zeppelin after acquiring a partially dismantled Precision Flight Controls simulator. The machine reportedly logged 3,287 hours during its working life and was associated with an FAA-approved training configuration. Its structure and motion hardware survived, but important interface equipment and the original wraparound visual system did not.
Restoring this serious flight simulator will therefore require more than installing a gaming PC and finding the “realism” slider. It is a multidisciplinary project involving mechanical restoration, electronics, software development, motion-control engineering, aviation knowledge, and a disciplined approach to safety.
First, Define What “Restored” Actually Means
Before buying a single circuit board, the team must decide what the finished simulator is supposed to be. There are three very different possible destinations.
A historically faithful restoration
This approach would preserve as much original hardware, wiring, software, and behavior as possible. It would have the greatest historical value, but obsolete computers and undocumented proprietary interfaces could make it expensive or impractical. A perfectly preserved cockpit that cannot reliably run is also less entertaining than it sounds.
A modern simulator inside an original shell
The practical option is to retain the cockpit, controls, instruments, and motion system while replacing the missing computational layer with modern hardware. Microsoft Flight Simulator, X-Plane, or another current simulation platform could supply the aircraft model, scenery, weather, and system data.
This would not be an untouched restoration. It would be a careful modernizationrather like placing a modern engine in a classic car, except the car also contains hundreds of switches that all expect an answer.
A qualified aviation training device
This is the most demanding goal. The FAA distinguishes among aviation training devices, flight training devices, and full flight simulators. Devices used for regulatory training credit must meet defined performance and documentation requirements. Under 14 CFR Part 60, qualified flight simulation training devices are subject to objective testing, continuing evaluation, configuration control, and quality-management procedures.
A machine that was once approved or qualified does not automatically retain that status after being dismantled, modified, sold, or separated from its supporting software. Restoring it as an impressive recreational simulator is achievable. Returning it to formal training service would require a sponsor, approved documentation, validation data, testing, and coordination with the FAA.
Inventory Every Component Before Rebuilding Anything
The smartest first step is not repair. It is documentation. Every module, cable, connector, circuit board, instrument, motor, sensor, and mounting point should be photographed and assigned an inventory number.
The team should record:
- Manufacturer names, model numbers, and serial numbers
- Connector types and complete pin counts
- Wire colors, labels, destinations, and shielding
- Power requirements and grounding arrangements
- Mechanical movement, travel limits, and linkage geometry
- Signs of corrosion, overheating, modification, or previous repairs
- Missing modules shown in manuals, photographs, or wiring diagrams
A searchable database will be more useful than a heroic pile of handwritten notes. Each component can be classified as reusable, repairable, replaceable, unknown, or decorative. “Unknown” will probably be popular at first.
This process also prevents a common restoration mistake: removing a mysterious wire because it appears unnecessary, only to discover six months later that it was the only connection to a critical position sensor.
Make the Structure and Motion Base Safe
The cockpit chassis is one of the project’s strongest assets. Commercial simulator structures are built to withstand repeated use, but age, transportation, storage, and disassembly can loosen fasteners or damage hidden load-bearing parts.
The frame should be inspected for cracks, corrosion, distorted brackets, worn bearings, and damaged welds. Seats, restraints, access steps, doors, and emergency exits deserve equal attention. A simulator that moves people must be treated as machinery, not oversized gaming furniture.
Inspect the motion hardware independently
The motion system should be tested without occupants and, initially, without commands from flight-simulation software. Actuators, motor drives, encoders, limit switches, and power supplies must be evaluated as a separate industrial system.
The restoration needs hard travel limits, software limits, an easily reached emergency stop, overcurrent protection, and a fail-safe response to lost communication. If the computer freezes, the platform should stop safely rather than attempt an enthusiastic barrel roll through the workshop wall.
Motion is about cues, not reproducing an entire flight
A limited-travel platform cannot sustain the acceleration of a real aircraft. Instead, motion-cueing software creates short movements that suggest acceleration, turbulence, braking, or a bank, then slowly returns the platform toward center without attracting attention.
Poor cueing is worse than no motion. Excessive tilt, delayed response, or disagreement between movement and the visual scene can cause discomfort. The team should begin with conservative motion limits and tune each axis using recorded test flights.
Reverse-Engineer the Cockpit Controls
The yokes, rudder pedals, throttle quadrant, trim wheels, switches, and knobs are the physical soul of the simulator. Replacing them with consumer controllers would work, but it would waste much of what makes the machine special.
Older professional controls may use potentiometers, optical encoders, resolvers, Hall-effect sensors, force sensors, or proprietary input boards. Each control must be traced and measured to determine its output range, electrical characteristics, direction, and neutral position.
Build a modular interface layer
Modern microcontrollers can translate legacy cockpit hardware into USB, serial, CAN, or Ethernet data. A Raspberry Pi Pico, Arduino-compatible controller, or dedicated USB interface board can read switches and analog axes. Small Linux computers can coordinate more complicated instrument modules over a local network.
Dividing the cockpit into zones makes maintenance easier. One controller might manage flight controls, another the throttle quadrant, and a third the instrument panel. If one module fails, the rest of the simulator can still be tested.
Every interface should have a documented pinout, replaceable connectors, and diagnostic software. A live test screen showing the state of each switch and axis will save countless hours. Without one, troubleshooting becomes an exciting game called “Is the problem in the cockpit, the network, the driver, or the software?” Nobody wins that game.
Decide Which Instruments to Preserve
The avionics stack is reportedly less complete and less thoroughly documented than the motion system. Some equipment is missing, while other sections show evidence of previous modification. That makes the panel one of the restoration’s largest uncertainties.
Traditional analog gauges may be driven by stepper motors, servos, synchros, air pressure, or electrical signals designed for the original simulator computer. Authentic glass-cockpit displays may expect specialized aviation data buses rather than ordinary video input.
The team can use several approaches:
- Repair and drive original instruments where documentation is available.
- Replace internal mechanisms while retaining original faces and needles.
- Install small LCD panels behind instrument bezels.
- Use larger hidden monitors to render several gauges at once.
- Place tablets in locations where modern electronic flight bags would be realistic.
A hybrid panel will probably produce the best balance of authenticity, reliability, and cost. Important controls should remain physical, while difficult displays can be recreated digitally. The objective is not to preserve every obsolete circuit at any price; it is to preserve the cockpit experience.
Create a Reliable Software Architecture
A current gaming computer can produce scenery and flight dynamics that would have required specialized equipment when the simulator was new. However, graphics are only one part of the system.
The restored simulator needs software that can:
- Read flight controls and cockpit switches
- Send aircraft data to instruments
- Drive annunciators, lighting, and audio
- Generate commands for the motion controller
- Manage startup, shutdown, and fault recovery
- Log data for calibration and troubleshooting
Microsoft Flight Simulator provides SimConnect, an interface through which external applications can read simulation variables, send events, operate hardware, and control additional views. X-Plane also offers data-output and plugin options. Either platform can work, but the team should select one primary environment before building hundreds of mappings.
Use middleware instead of connecting everything directly
A middleware service can translate simulator data into a stable internal format. The instrument panel should not need to know whether airspeed came from Microsoft Flight Simulator, X-Plane, or a test program. It should simply receive a clearly defined airspeed value.
This separation allows the team to test each subsystem without loading a full flight. It also makes future software changes less painful. Flight simulators evolve; a well-designed interface layer prevents every update from becoming a small household emergency.
Rebuild the Visual System Around the Cockpit
The original large wraparound projection screen is missing. Replacing it raises questions about space, resolution, viewing angles, heat, alignment, and cost.
A curved screen with multiple projectors offers excellent peripheral vision, but it requires geometric warping, edge blending, careful mounting, and controlled lighting. Three large displays are simpler and sharper, although bezels may interrupt the outside view. A high-resolution television array could be an economical compromise.
Virtual reality provides immersion without a projection room, but it hides the physical cockpit unless mixed-reality passthrough is used. It may also make it harder for several people to observe, instruct, or troubleshoot. For a simulator whose appeal lies in real switches and instruments, a physical visual system remains the most natural fit.
The final choice should be based on measured cockpit sightlines. Before buying displays, the team can build cardboard templates or use inexpensive temporary monitors to evaluate visibility from both seats.
Calibrate the Simulator as One Complete Machine
Even if every subsystem works independently, they must agree with one another. The yoke must reach neutral when the simulated control surface does. Airspeed on the panel must match the software. The visual horizon, cockpit attitude, and motion platform must move at the correct time and in the correct direction.
Calibration should proceed from simple to complex:
- Validate switches, buttons, and control axes.
- Calibrate instruments against known software values.
- Test lighting, sound, and warning systems.
- Run the visual system without motion.
- Test motion at reduced power without occupants.
- Add conservative motion cues and conduct seated tests.
- Record complete flights and investigate every mismatch.
A structured acceptance checklist should cover normal operations, sensor failures, software crashes, network interruptions, emergency stops, and safe shutdown. Reliability is part of realism. A cockpit that needs three reboots before takeoff mostly simulates commercial printers.
How Much Time, Money, and Expertise Will It Take?
The surviving components make this project more affordable than building an equivalent professional cockpit from scratch, but “affordable” is doing some strenuous work in that sentence.
A modern computer, displays or projectors, microcontrollers, interface boards, wiring materials, replacement sensors, power equipment, networking hardware, and fabrication supplies could easily consume thousands of dollars. Professional work on motion controls, structural parts, or proprietary avionics could push the cost much higher.
The biggest expense may be time. A small volunteer team should expect a multi-stage project lasting many months, and potentially several years if the goal includes refined motion, a complete instrument panel, and museum-quality presentation.
The ideal restoration team would combine an aviation technician or pilot, a mechanical engineer, an electronics specialist, a software developer, and someone unusually enthusiastic about labeling cables. Community collaboration is especially valuable because no single person is likely to understand every surviving subsystem.
Restoration Experiences: What Builders Learn Along the Way
Technical plans explain what should happen. Restoration experience reveals what actually happens once a complicated machine arrives in the workshop.
The first victory will seem ridiculously small
Large simulator restorations rarely begin with a dramatic first flight. The first success may be a landing-gear indicator illuminating, a throttle axis moving smoothly on a diagnostic screen, or an analog needle finally responding to software data.
These moments matter because they prove that the old hardware and new electronics can communicate. Recording each small milestone also keeps volunteers motivated when the cockpit still resembles an aircraft-themed storage unit.
Every repaired system will expose another mystery
Once electrical power is restored, a switch that appeared functional may bounce between states. A stable instrument may become erratic when a motor starts. One reversed sensor can make the motion platform lean in exactly the wrong direction.
Builders quickly learn to change one variable at a time. They keep known-good test programs, measure voltages under load, and avoid replacing five components simultaneously. Otherwise, a successful repair cannot be distinguished from a lucky accident.
Ergonomics will become surprisingly important
A control can be electrically perfect yet unpleasant to use. The yoke may feel too light, the pedals may lack resistance, or a replacement display may sit at the wrong depth behind the panel. During longer sessions, small inaccuracies become glaring.
This is why pilots and experienced simulator users should test the cockpit early. Their observations can uncover problems that do not appear on a wiring diagram: an awkward switch location, an unrealistic throttle detent, or a visual horizon positioned too high.
The first motion test should be intentionally boring
There is a powerful temptation to make the platform perform its largest possible movement as soon as the actuators operate. Experienced builders resist it. They begin with low speed, restricted travel, no occupant, and one axis at a time.
Only after verifying feedback sensors, limit switches, communication-loss behavior, and the emergency stop do they add a person. The memorable experience should be the first coordinated takeoffnot explaining to a neighbor why part of a simulator is now embedded in a garage shelf.
The project will never feel completely finished
After the first successful flight, the team will notice a delayed gauge, a missing annunciator, imperfect projector alignment, or a sound effect that lacks conviction. That is normal. A serious simulator is a platform that can be refined continuously.
The best milestone is therefore not “everything is perfect.” It is “the simulator is safe, stable, documented, and enjoyable to operate.” Improvements can then be released as controlled upgrades rather than emergency repairs.
The result can preserve more than hardware
A restored simulator demonstrates how aviation training, computer graphics, electronics, and motion systems evolved together. Visitors can experience procedures and cockpit workloads that are difficult to communicate through a static museum display.
That educational value may ultimately be the project’s greatest reward. The machine can connect veteran pilots, young builders, programmers, and aviation enthusiasts around a working artifact rather than a cockpit sitting silently behind a rope.
Conclusion
Restoring this serious flight simulator is technically possible because its most valuable foundationsthe cockpit, controls, structure, and documented motion hardwarestill exist. The practical path is to preserve those physical systems while replacing missing computers and difficult proprietary electronics with a modular modern architecture.
Success will depend on careful documentation, safe motion-control engineering, patient reverse-engineering, and disciplined testing. It will also require a clear distinction between creating a remarkable recreational simulator and returning a device to FAA-qualified training status.
The project will not be completed by one magical gaming PC or a heroic weekend with a soldering iron. It will be completed one verified switch, calibrated gauge, and cautious motion test at a time. When the restored cockpit finally rolls down a virtual runway, every hour spent tracing wires will suddenly seem reasonableor at least easier to forgive.
Note: The simulator discussed here was formerly associated with an approved professional training configuration, but a rebuilt or substantially modified machine should not be represented as currently FAA-approved or qualified unless it has completed the applicable evaluation process.