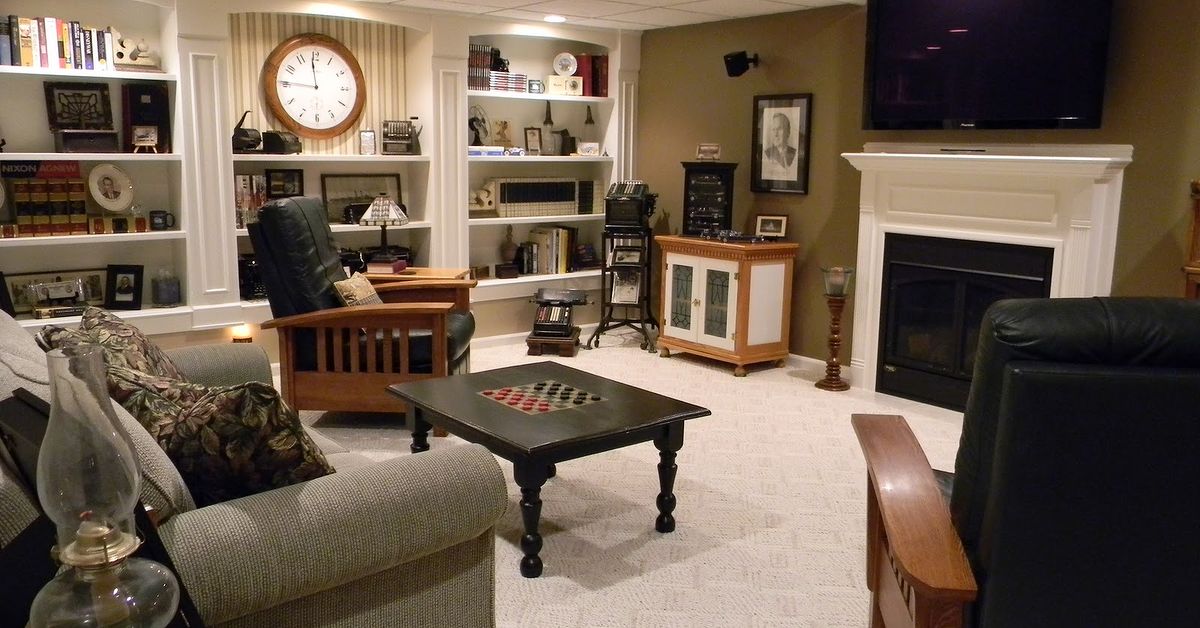
Every home has “that” spacethe one where old paint cans, mystery cables, and abandoned treadmills go to retire.
In my house, that space was the basement. No windows, outdated built-ins, and a TV setup that looked like it had last
been updated when DVDs were cutting-edge. So instead of pretending the basement didn’t exist, I did what any
self-respecting homebody would do: I turned it into a cozy basement media room/man cave worthy of its own Hometalk post.
Inspired by real-life basement makeovers, home theater guides, and more “man cave ideas” boards on Pinterest than I care
to admit, I tackled a complete transformation. Out went the clunky built-in media center. In came an electric fireplace
with a 50-inch TV mounted above it, plush seating, layered lighting, and storage that hides all the chaos of real life.
The result? A basement media room that works as a family movie zone, game-day HQ, and late-night Netflix bunker.
From storage dungeon to basement media room
Decluttering the cave (step one: admit you have a problem)
Before you think about surround sound or stadium seating, you have to face the junk. My basement started out as
a low-budget storage locker: leftover furniture, seasonal décor, random boxes. The first “DIY” project wasn’t glamorous
at allI spent a weekend sorting everything into keep, donate, sell, and “why do we own this?” piles.
Once the floor was clear, I could finally see the actual footprint of the room. That’s when the fun part starts.
You can measure for seating, decide where the TV or projector wall will go, and sketch out traffic patterns.
A media room works best when you can walk through it without tripping over storage bins or extensions cords,
so treat decluttering as part of the design processnot just a chore.
Fixing basement issues first: moisture, light, and sound
Basements make fantastic media rooms because they’re naturally darker and more sound-isolated than the rest of the house.
But they do come with quirks. I started by checking for moisture problems and sealing hairline cracks, then added a
dehumidifier to keep the air comfortable. This isn’t the glamorous “after” photo work, but it’s what makes the room
feel like a cozy lounge instead of a semi-finished cave.
Next up was lighting and sound. Because there are no windows in my basement, I had total control over brightnessgreat for
movie nights. I planned for multiple layers of light on dimmers so the room could go from “cleaning mode” to “cinema mode”
with a quick slider adjustment. The solid walls and underground location also help keep sound from bleeding into the rest
of the house, which is perfect when the subwoofer gets enthusiastic during action scenes.
Designing the media wall: fireplace + TV = instant focal point
The biggest eyesore in the original basement was an out-of-date built-in media center that dominated one wall.
It was bulky, shallow, and designed for older boxy TVs, not today’s sleek flat screens. Step one of the glow-up was
ripping that thing out and starting fresh with a streamlined media wall.
I installed an electric fireplace insert at eye level when seated, then mounted a 50-inch TV just above it.
The combination of flames and screen gives the room a cozy, high-end home theater vibe without needing a chimney
or gas line. Because there are no windows, there’s no glare issue, and the fireplace provides ambiance even when
the TV is offperfect for game nights or just hanging out.
Hidden wiring and an A/V “brain center”
One thing that instantly cheapens a media room is a tangle of wires running everywhere. To avoid the “cable monster” look,
I ran conduit inside the wall behind the TV so power and HDMI cables disappear. All the source componentsstreaming box,
game console, receiverlive in a low cabinet to the side, essentially acting as the brains of the room.
If you’re building your own system, think of this cabinet as your A/V rack. It should be:
- Well-ventilated so components don’t overheat.
- Easy to access from the front and back for swapping cables.
- Close enough to the TV that cable runs are short and clean.
- Large enough to handle future gear (because there’s always “just one more” gadget).
A universal remote or smart home app can tie everything together, so you’re not juggling five different remotes
every time you want to watch a movie or switch from streaming to gaming.
Lighting, sound, and seating: the theater trifecta
Layered lighting on dimmers
A good basement media room should be able to shift moods easily. I included:
- Recessed ceiling lights on dimmers for bright cleaning or casual hangouts.
- Wall sconces for low-level ambient light during movies.
- LED strip lights behind the TV and under cabinets for that subtle theater glow.
The key is flexibility. Bright light is essential for cleaning, building Lego sets on the coffee table, or working on a laptop.
For movie time, I dim everything to a warm, low level that keeps you from tripping over ottomans but doesn’t wash out the screen.
Surround sound that doesn’t dominate the room
Because the basement already has solid walls and fewer openings, sound carries better than in many upstairs living rooms.
I opted for a 5.1 surround system with front speakers flanking the TV, a center channel below it, and rear speakers mounted
on the side walls. The subwoofer tucks discreetly into a corner, where it adds punch without being an eyesore.
If you’re working with a smaller budget or space, a good soundbar with a wireless sub can still deliver a big upgrade over your TV’s
built-in speakers. The goal is not necessarily “IMAX at home,” but a balanced soundstage where dialogue is clear and effects feel immersive.
Choosing the right seating (and yes, recliners are allowed)
Seating is the heart of the man cave. I went with a deep, reclining sectional that can handle everything from solo binge-watching
to a full house for the big game. Look for:
- Supportive cushions that don’t swallow you whole.
- Easy-to-clean upholstery (dark colors hide popcorn incidents).
- Built-in cup holders or side tables for drinks and snacks.
In bigger rooms, you can do two rows: a primary sofa closer to the screen and a raised bar with stools behind it.
In smaller basements, a single well-chosen sectional or loveseat plus a couple of movable poufs gives you flexibility
without overcrowding the room.
Decorating the man cave: themes, textures, and personal touches
Once the bones of the room were in place, it was time to make it feel like a true man cave/media room instead of a generic
basement. I leaned into a casual, slightly industrial look: warm wood tones, metal accents, and a mix of soft textiles.
Some easy ways to personalize a basement media room:
- Sports fan? Frame jerseys, tickets, or vintage team posters in a gallery wall around the TV.
- Movie buff? Hang minimalist film posters, light-up marquee letters, or a “Now Showing” sign.
- Gamer? Create a dedicated console or PC corner with floating shelves for controllers and headsets.
- Music lover? Display vinyl records or instruments as décor.
The key is to keep it cohesive. Choose one main theme and a simple color palette (for example, charcoal, tan, and deep blue)
so everything feels intentional rather than random.
Smart storage: hiding the mess, showcasing the fun
A real-life media room collects stuff: blankets, game controllers, board games, snack bowls, and about twelve remote controls.
To keep the basement from sliding back into “storage unit” territory, I added storage everywhere I could without crowding the room.
- Closed base cabinets under the media wall for electronics, cables, and DVDs.
- Ottomans with lift-up tops to hide blankets and extra pillows.
- Built-in shelves along one wall, styled with a mix of books, baskets, and decorative pieces.
- A narrow console table behind the sofa for chargers, coasters, and small accessories.
Think of storage as part of the design. The more clutter you can tuck away, the more your basement media room will feel like
a retreat instead of a catchall.
Budget and DIY: spending where it matters
Basement media rooms can range from budget-friendly to “did we just build a real cinema?” territory.
To keep things realistic, I prioritized three splurges:
- A quality TV or projector setup so movies and games actually look amazing.
- Comfortable seating that makes people want to stay for a double feature.
- Lighting and dimmers to make the space feel intentional and high-end.
Everything elsedecor, side tables, shelvingcame from a mix of DIY projects, repurposed furniture, and bargain hunting.
Paint is one of the cheapest ways to transform a basement, especially if you choose a warm neutral on the walls and a darker
shade on the ceiling to help the room feel more intimate.
If you’re handy with basic tools, you can DIY framing, painting, and even some trim work. For electrical upgrades,
recessed lighting, and major structural changes, it’s worth hiring pros for safety and code compliance.
Maintenance, safety, and future-proofing
Once your basement media room/man cave is finished, a few simple habits keep it looking and working its best:
- Run a dehumidifier as needed to protect electronics, furniture, and finishes.
- Use surge protectors or a power conditioner for your A/V equipment.
- Label cables and keep a simple diagram of your setup for future upgrades.
- Leave access panels or removable sections behind the media wall so you’re not tearing things apart later.
Tech changes fast, so I planned for flexibility: extra conduit runs in the wall, a bit of extra space in the A/V cabinet,
and modular shelves that can be reconfigured as new gear comes into the picture.
Final verdict: why this basement media room works
In the end, what makes this basement media room/man cave successful isn’t just the electric fireplace or the 50-inch TV.
It’s the way the room actually gets used. It’s where we cheer during big games, have movie marathons on rainy weekends,
and hide out with snacks when the rest of the house is a mess.
By starting with a clear plan, tackling the unglamorous basement issues first, and layering in lighting, sound, comfort, and
personality, the space went from forgotten storage dungeon to the most popular room in the house. And the best part?
It still feels like “us”not a showroom spread, but a real-life, cozy, slightly popcorn-crumbed media room that earns its
man cave title every weekend.
What I learned from creating my own basement man cave
After living with this space for a while, I’ve picked up a few hard-earned lessons that might save you time (and money)
if you’re planning your own basement media room or Hometalk-worthy man cave.
1. Plan the layout before you buy a single piece of furniture
It’s tempting to fall in love with a massive sectional or a huge TV first and figure the rest out later,
but the most successful rooms start with a floor plan. I used simple graph paper and painter’s tape on the floor to map out:
- Viewing distance from the seats to the TV.
- Traffic flow from the stairs to the seating area.
- Where doors, support columns, or low ceilings might cause issues.
Doing this first kept me from crowding the room and helped me choose a TV size that felt impressive but not overwhelming.
It’s much easier to adjust lines on paper than to return a sofa that won’t fit down the basement stairs.
2. Comfort > perfection
I originally considered sleek theater recliners in perfectly aligned rows, but the more I thought about how we actually live,
the more I realized we needed somewhere you could lounge sideways with a blanket and a bowl of popcorn.
That’s why the sectional won out.
Real life happens in this room: kids stretching out on the floor, friends bringing over snacks, and pets claiming the best seat in the house.
Choosing durable fabrics, washable throw blankets, and furniture with rounded corners instead of sharp edges makes the room feel
relaxed rather than precious.
3. The “little” details matter a lot
Some of my favorite parts of the man cave aren’t the big-ticket items at all. It’s the dimmer switch that lets me fine-tune
the light levels, the hidden charging station behind the sofa, and the small shelf where remotes, game controllers, and
headphones actually live instead of going missing every 24 hours.
I also added a small snack zonea bar cart with a lidded jar for popcorn kernels, a few snack bowls, and a basket for candy.
It’s not a full wet bar, but it keeps everything close enough that no one has to sprint upstairs in the middle of a crucial scene.
4. Don’t be afraid to mix “man cave” and “family cave” vibes
The phrase “man cave” might make you picture neon beer signs and dark, heavy furniture, but modern basement media rooms can be
stylish and welcoming for everyone. I mixed in softer elementsa textured rug, layered pillows, warm wood tonesso the space
feels inviting whether it’s a solo game night, a kids’ movie party, or a family gathering.
If you share the home with a partner or kids, think of the man cave more as a “personality cave”a place to celebrate your interests,
but still comfortable for the rest of the household. That’s the sweet spot.
5. Your first version won’t be your final version
The room you finish today won’t be exactly the same room you’ll be using a year from nowand that’s okay.
I’ve already swapped out a coffee table for one with storage, added blackout curtains over the stair opening to block light,
and replaced one piece of art with a framed jersey.
Treat your basement media room as a living space that can evolve. Maybe you add a projector later, upgrade the sound system,
or build a small bar along the back wall. As long as you’ve left yourself a little flexibilityextra power outlets,
open wall space, movable furnitureyou can keep improving it over time without tearing everything out.
In the end, my biggest takeaway is this: a successful basement media room/man cave doesn’t have to be perfect or wildly expensive.
It just needs to be intentional, comfortable, and tailored to how you actually live. When you get that right,
you’ll find yourself heading downstairs more often, turning off your phone, and actually enjoying the home you’ve created
which, to me, is the ultimate goal of any makeover.