Few kitchen betrayals feel as personal as an oven that lies. You set it to 350°F, slide in a pan of cookies, and somehow the results look like they spent a semester abroad on the sun. Or maybe your casseroles come out pale, sleepy, and suspiciously underdone. Before blaming your recipe, your baking pan, or the cookie dough for “not believing in itself,” it is smart to test your oven thermostat.
In everyday language, people often say “oven thermostat” when they mean the whole temperature-control system. On older ovens, that may be a true mechanical thermostat behind the temperature knob. On many modern electric and gas ovens, the oven uses a temperature sensor, electronic control board, heating element or igniter, and calibration setting to manage heat. Either way, the goal is the same: find out whether the temperature inside the oven matches the temperature you selected.
This guide walks you through how to test an oven thermostat in 13 practical steps, using simple tools, safe habits, and realistic expectations. You do not need to be an appliance wizard with a cape made of wiring diagrams. You do need patience, an oven-safe thermometer, and the discipline not to open the oven door every 40 seconds like it owes you money.
Why Testing Your Oven Thermostat Matters
An inaccurate oven temperature can ruin more than dessert. It can affect bread rise, roasting time, food texture, and even food safety. Baking is especially sensitive because cakes, cookies, pies, and breads depend on steady heat. A 25°F difference may not sound dramatic, but in baking, that is the difference between golden-brown perfection and “crispy emotional damage.”
Testing the thermostat also helps you avoid unnecessary repairs. Sometimes the oven is not broken at all; it simply needs calibration. Other times, the problem is not the thermostat but a weak bake element, faulty oven temperature sensor, damaged door gasket, bad igniter, or control-board issue. A careful temperature test gives you clues before you spend money on parts or call a technician.
Tools You Need Before You Start
Gather your tools first so you do not have to sprint around the kitchen while the oven is hot. For a basic temperature accuracy test, you need an oven-safe thermometer. A hanging dial oven thermometer works, but a digital probe thermometer with an air probe can be easier to read without opening the door. Do not use an infrared thermometer as your main tool because it measures surface temperature, not the true air temperature inside the oven.
If you plan to test the oven temperature sensor electrically, you will also need a multimeter, screwdriver, work gloves, and your oven’s manual or model number. For safety, always disconnect power before removing panels, sensors, or wires. If you have a gas oven and smell gas, stop immediately, avoid switching electrical devices on or off, leave the area, and contact your gas provider or a qualified professional.
How to Test an Oven Thermostat: 13 Steps
Step 1: Read the Owner’s Manual or Find the Model Number
Start with your oven’s model number. It is often located around the oven door frame, storage drawer, control panel area, or side trim. The manual tells you whether your oven has a calibration feature, how to access it, and whether the upper and lower ovens on a double oven must be adjusted separately.
This matters because brands handle calibration differently. Some ovens adjust in 5°F increments, some in 10°F increments, and some allow a range such as plus or minus 30°F or 35°F. Guessing at the button sequence is a great way to accidentally turn your oven into a beeping puzzle box.
Step 2: Choose the Right Thermometer
Use a thermometer made for oven temperatures. A basic dial oven thermometer is affordable and useful, but it may react slowly. A digital thermometer with an oven-safe probe can be more responsive. If possible, use a thermometer you trust, because testing an oven with a bad thermometer is like asking a raccoon to audit your taxes.
For best results, avoid placing the thermometer directly on a baking sheet unless the test specifically calls for it. Metal can influence readings. You want to measure the oven air near the center of the cavity, not the temperature of a hot rack, pan, or wall.
Step 3: Place the Rack in the Center Position
Move one oven rack to the center position. Most manufacturer calibration guides recommend testing from the center of the oven because it gives a fair reading of the cooking zone. If your oven has multiple racks, remove extras or keep them away from the thermometer so airflow is not blocked.
Place the thermometer in the middle of the center rack. If it hangs, position it so it does not touch the rack or oven wall. If it stands, make sure it is stable and easy to see through the door window.
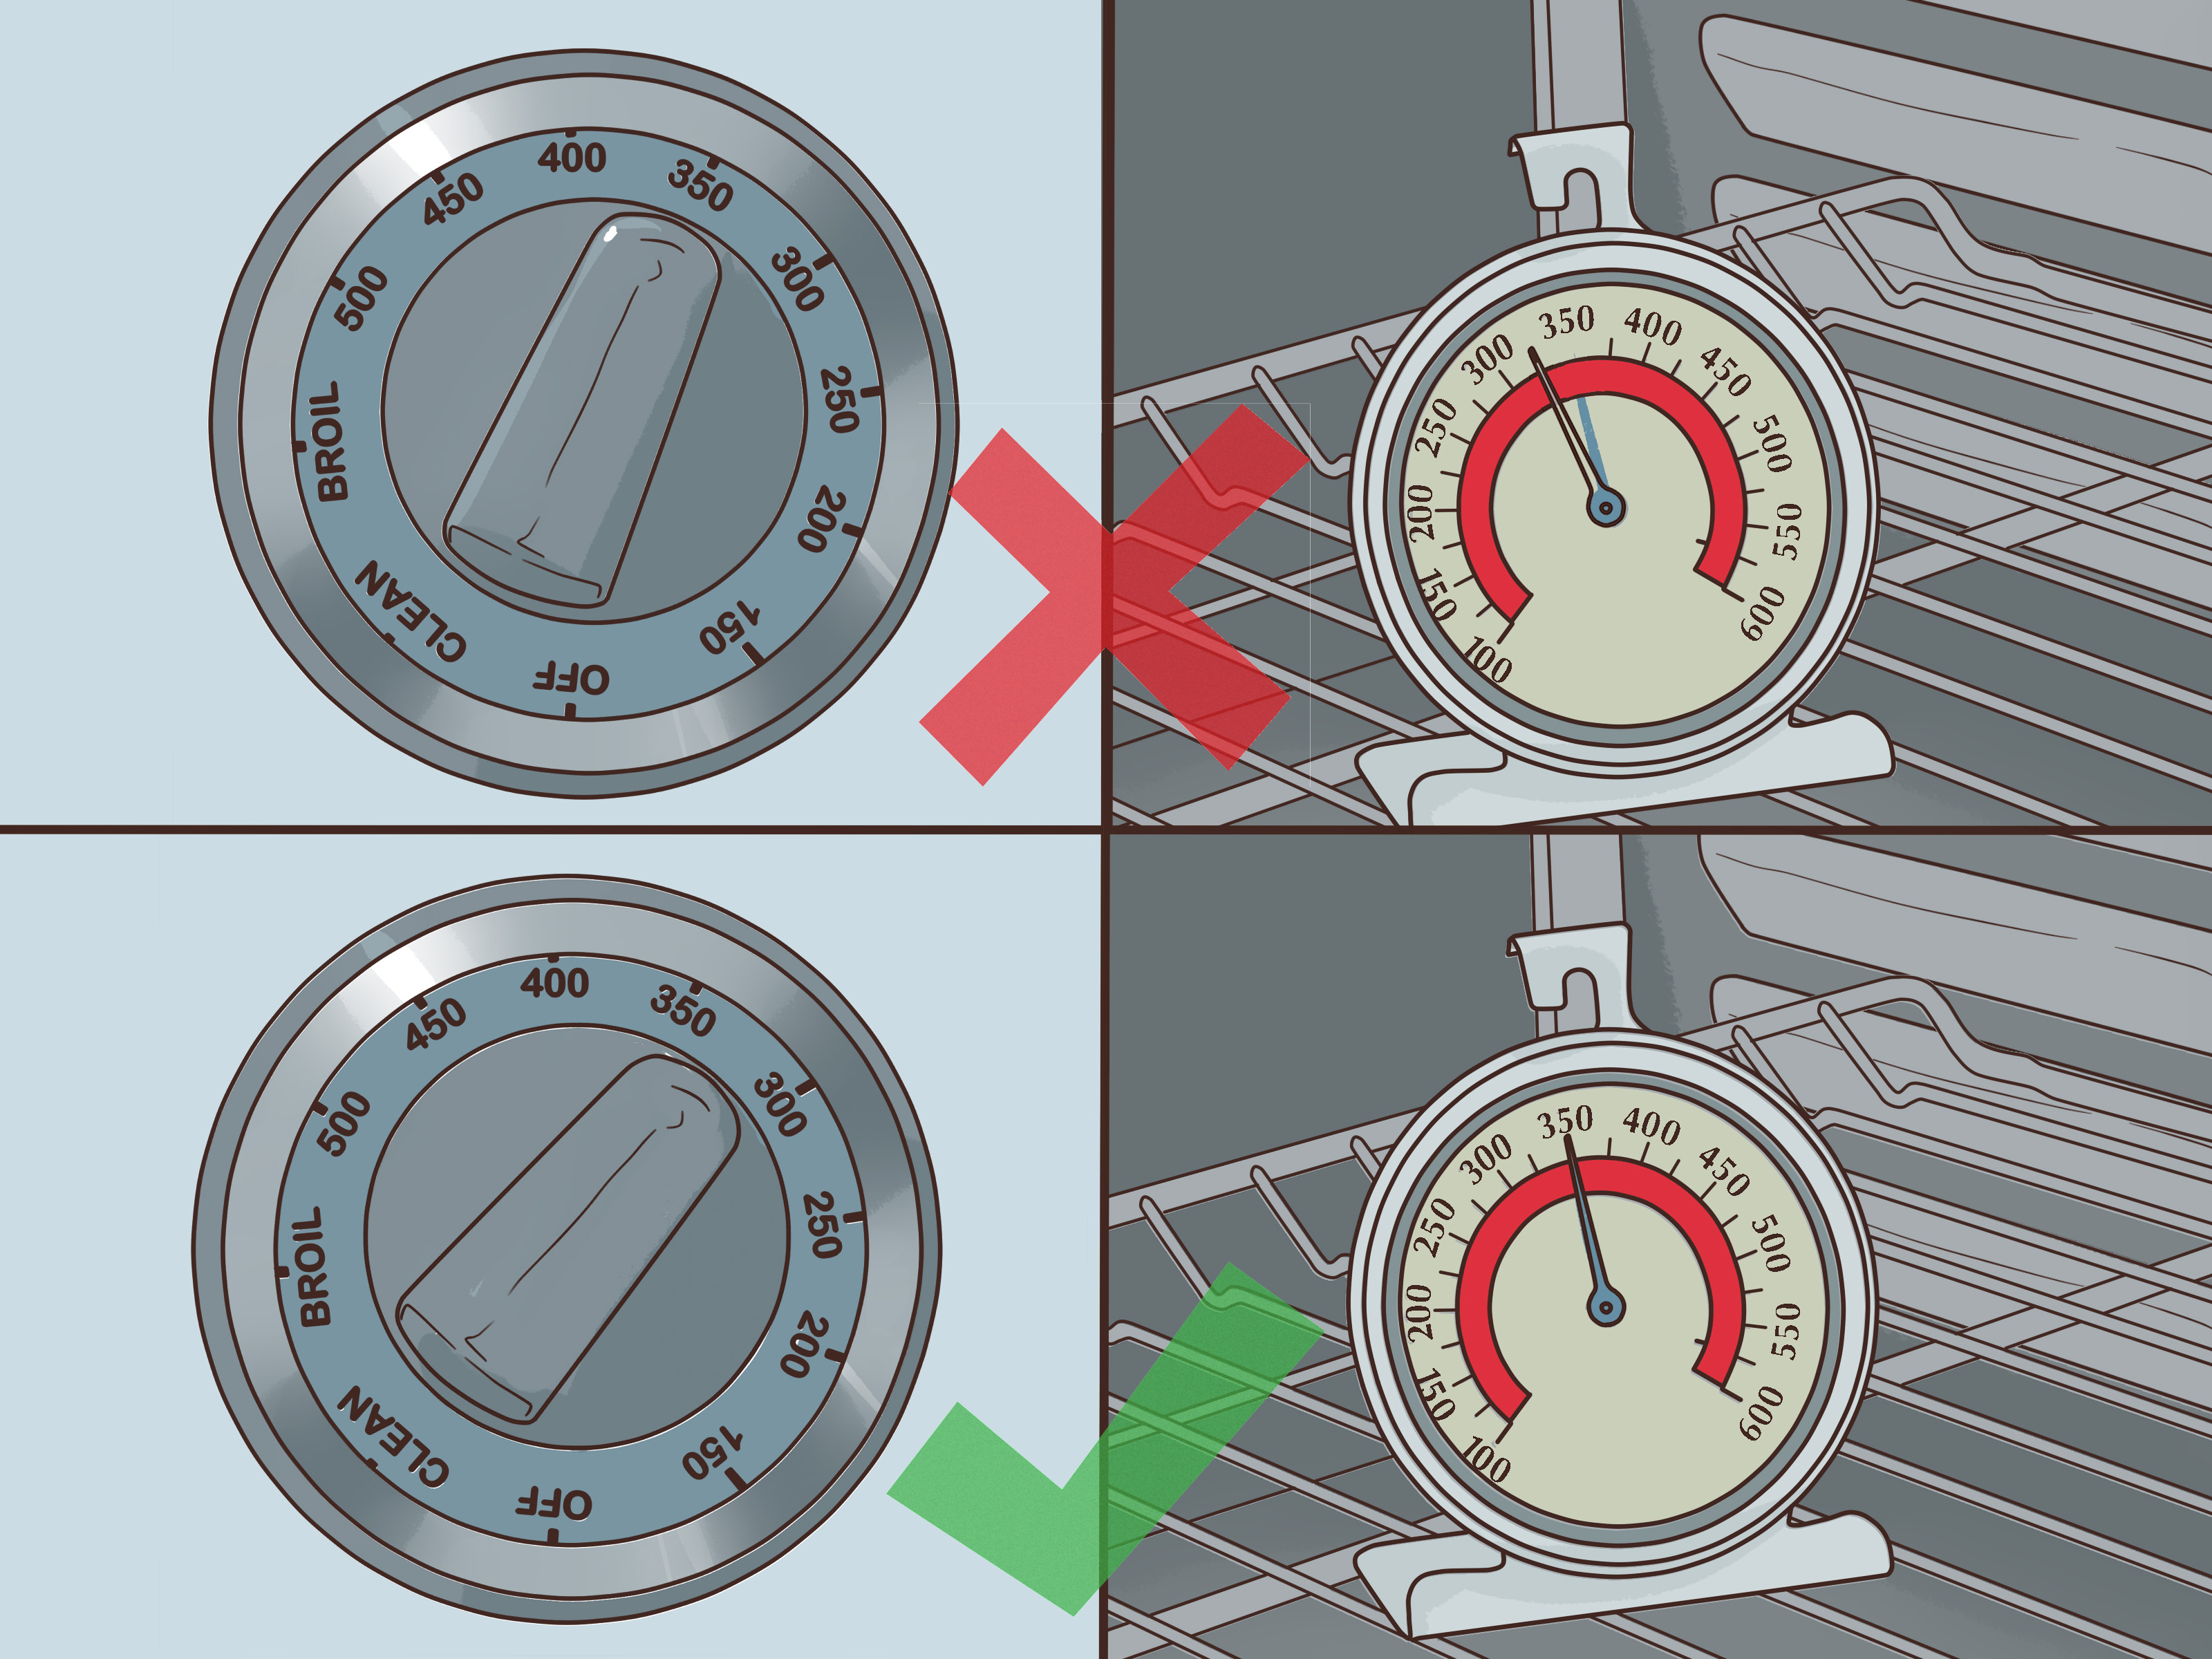
Step 4: Set the Oven to 350°F
Set the oven to 350°F, the classic testing temperature. It is hot enough to reveal common accuracy problems and familiar enough for baking comparisons. Some technicians also test at 375°F or 400°F, especially if the owner mainly roasts or bakes at those temperatures. For a first test, 350°F is a practical baseline.
Use the regular Bake setting, not Broil, Self-Clean, Air Fry, or a specialty mode. If your oven has convection, turn convection off for the first test unless you are specifically trying to evaluate convection performance.
Step 5: Let the Oven Fully Preheat
Wait until the oven signals that preheating is complete. Then wait a little longer. Many ovens beep before the entire oven cavity has fully stabilized. A reasonable approach is to allow another 10 to 15 minutes after the preheat signal, especially for larger ovens or older models.
Do not open the door during preheating unless absolutely necessary. Every door opening releases heat and can throw off your readings. Ovens are dramatic; one peek can make the temperature drop faster than your motivation after seeing a sink full of dishes.
Step 6: Record the First Temperature Reading
Look through the oven window and record the thermometer reading. If you must open the door, do it quickly and safely. Wear an oven mitt, read the thermometer as fast as possible, and close the door right away.
Do not panic if the thermometer does not say exactly 350°F. Ovens cycle. They heat above the set temperature, shut off, cool slightly, then heat again. The thermostat or sensor is trying to maintain an average temperature, not hold one perfect number every second.
Step 7: Track Several Heating Cycles
For a more accurate test, record several readings over 20 to 40 minutes. Write down the high and low points as the oven cycles. For example, your oven might climb to 370°F, drop to 330°F, then climb again. That does not automatically mean it is defective. The average is what matters.
A simple home method is to take a reading every five minutes after the oven has stabilized. Record at least four to six readings. If you want a more advanced method, record the high point when the heat turns off and the low point when it turns back on, then average the numbers.
Step 8: Calculate the Average Temperature
Add your readings together and divide by the number of readings. For example, suppose your readings are 340°F, 345°F, 355°F, 360°F, 350°F, and 345°F. The total is 2,095. Divide by 6, and the average is about 349°F. That oven is doing just fine. Please apologize to it.
Now imagine the readings average 323°F while the oven is set to 350°F. That is a 27°F difference, which is large enough to affect baking and roasting. A consistent offset is often a good candidate for calibration, if your model allows it.
Step 9: Decide Whether the Difference Is Normal
Small differences are normal. Many home ovens fluctuate above and below the set temperature during normal operation. A difference of around 10°F may not require action. A consistent difference of 15°F to 25°F may justify calibration, especially if your food results confirm the problem. A difference of 50°F or more suggests something else may be wrong.
Also watch for wild swings. If the oven sometimes runs 75°F too hot and sometimes 50°F too cold, the issue may not be a simple calibration offset. It could involve the temperature sensor, control board, heating element, igniter, relay, airflow, or door seal.
Step 10: Check for Simple Causes Before Adjusting Anything
Before changing calibration settings, inspect the basics. Make sure the oven door closes tightly. Check the gasket for tears, gaps, or hardened sections. Look for aluminum foil on the oven floor or racks, which can block heat and airflow. Confirm that pans are not crowding the oven walls.
In an electric oven, look at the bake element when heating. It should glow evenly. A burned, blistered, or partially glowing element can cause poor heating. In a gas oven, slow heating or uneven temperature may point to a weak igniter. These issues are not fixed by calibration; they need repair.
Step 11: Calibrate the Oven If the Offset Is Consistent
If your oven is consistently off by a predictable amount, use the calibration feature in the manual. For example, if the oven is set to 350°F but averages 325°F, you may need to increase the calibration by 25°F. If it averages 375°F, you may need to decrease it by 25°F.
Digital ovens usually use a control-panel sequence. Some models use Settings, Options, or a long press of a Bake-related button. Older mechanical knob ovens may have an adjustment screw behind the knob. Be gentle. Calibration is not a wrestling match. If the knob or screw resists, stop and check the manual.
Step 12: Test the Oven Temperature Sensor With a Multimeter
If calibration does not solve the problem, the oven temperature sensor may need testing. This is the slender metal probe usually mounted on the back wall of the oven cavity. On many common ovens, the sensor should measure roughly 1,080 to 1,090 ohms at room temperature, but you should always compare your reading with the specification for your exact model.
Disconnect power to the oven first. Remove the screws holding the sensor, gently pull the sensor forward, disconnect the wire harness, and test resistance across the sensor terminals with a multimeter set to ohms. If the reading is open, zero, or far from the expected range, the sensor may be faulty. If the sensor tests correctly, the issue could be wiring, the control board, a heating component, or another part.
Step 13: Retest After Calibration or Repair
After making a calibration adjustment or replacing a faulty part, repeat the thermometer test. Use the same rack position, same temperature, and same method so your results are comparable. Do not judge the oven based on one quick reading immediately after the preheat beep.
If the average temperature is now close to the set temperature and your food is cooking properly, you are done. If the oven still runs too hot, too cold, or unpredictably, it is time to call a qualified appliance technician. At that point, the oven may need diagnosis beyond a simple thermostat test.
Common Signs of a Bad Oven Thermostat or Temperature Sensor
The most obvious sign is food that consistently overcooks or undercooks even when you follow recipes carefully. Other clues include long preheat times, uneven baking, temperature error codes, heating that stops too early, or an oven that keeps heating past the set point.
However, these symptoms can overlap with other problems. A weak igniter can make a gas oven heat slowly. A damaged bake element can make an electric oven run cool. A loose door gasket can leak heat. A bad control board can misread a good sensor. That is why testing matters: it turns kitchen frustration into useful evidence.
How Much Temperature Difference Is Acceptable?
For everyday cooking, a small temperature difference is usually acceptable. Most recipes can survive a slight oven variation, especially casseroles, roasted vegetables, and sheet-pan meals. Baking is less forgiving. Cakes, cookies, macarons, soufflés, and bread prefer an oven that behaves like an adult.
A practical rule is this: if the oven average is within about 10°F of the set temperature, leave it alone. If it is consistently 15°F to 25°F off and your results suffer, calibrate it. If it is more than 25°F off, inspect for other issues before assuming calibration is the only fix. If it is 50°F or more off, or if temperatures swing wildly, professional service is usually the wiser move.
Safety Tips When Testing an Oven Thermostat
Always treat the oven as a high-heat appliance, not a science fair toy with snacks nearby. Keep towels, paper, packaging, and loose sleeves away from hot surfaces. Use oven mitts when reaching near the oven cavity. Do not touch the heating elements, sensor probe, or interior walls while the oven is hot.
For electrical testing, disconnect power at the plug or circuit breaker. Some built-in ovens are hardwired, so turning off the correct breaker is essential. If you are not comfortable identifying wires, removing panels, or using a multimeter, stop at the thermometer test and call a professional. There is no shame in avoiding electrical surprises. Your eyebrows support this decision.
When to Call a Professional
Call a technician if the oven has gas odors, repeated error codes, sparks, damaged wiring, a tripping breaker, or temperature swings that do not follow a simple pattern. You should also get help if the sensor tests normally but the oven still heats incorrectly. That may point to a control board, relay, wiring harness, igniter, or element problem.
Professional diagnosis is also smart for built-in wall ovens because accessing parts can require pulling the oven from the cabinet. That job is heavier and riskier than it looks. Wall ovens do not gently float out like a drawer in a home-improvement commercial.
Practical Examples: What Your Test Results Mean
Example 1: Oven Set to 350°F, Average Is 348°F
This is normal. No calibration is needed. If food is still burning, check rack position, pan color, recipe timing, or convection settings.
Example 2: Oven Set to 350°F, Average Is 325°F
The oven is running about 25°F cool. If the offset is consistent, use the manual to raise the oven calibration by about 25°F, then retest.
Example 3: Oven Set to 350°F, Readings Swing From 280°F to 425°F
This is not a simple calibration problem. Check the temperature sensor, heating element, igniter, wiring, and control system. A technician may be needed.
Example 4: Oven Preheats Slowly and Never Reaches the Set Temperature
In an electric oven, the bake element may be weak or damaged. In a gas oven, the igniter may be failing. Calibration will not fix a heat source that cannot do its job.
Extra Experience Notes: Lessons From Real-Life Oven Testing
After testing a few ovens, one lesson becomes clear: the preheat beep is not always the final word. Many ovens announce “ready” when the air near the sensor reaches the target temperature, but the racks, walls, door glass, and overall cavity may still be catching up. That is why waiting 10 to 15 minutes after preheat often gives a more honest reading. Think of it like letting a car warm up on a cold morning. Technically, it starts right away, but it behaves better after a minute.
Another practical lesson is that thermometer placement matters more than people expect. If you put the thermometer near the oven wall, close to the door, or directly above a heating element, you may get a misleading result. The center rack is the best starting point because it reflects where most food actually cooks. If you bake on multiple racks, you can test those positions later, but do not begin with a complicated experiment. First find out whether the oven is generally accurate.
It is also useful to test the oven the way you use it. If you mostly bake cookies at 350°F, test at 350°F. If you roast vegetables at 425°F every week, run a second test at 425°F. Some ovens are fairly accurate at moderate temperatures but drift at higher settings. That does not always mean the oven is broken; it may simply mean you need to understand its habits. Every oven has a personality. Some are dependable. Some are moody. Some act like they trained under a dragon.
One common mistake is adjusting the calibration after a single thermometer reading. Do not do that. Because ovens cycle, one reading may catch the oven at a high or low point. Adjusting from that number can make the problem worse. Always average several readings after the oven has stabilized. If the average is consistently off, then calibration makes sense.
Another experience-based tip: clean ovens test better. Grease buildup, foil liners, burned food, and blocked vents can interfere with heat flow. You do not need a museum-quality oven interior, but the oven should be reasonably clean before you test. Also check the door gasket. A small gap can leak enough heat to make the oven work harder and cook unevenly.
Finally, remember that calibration is for consistent offsets, not chaos. If your oven is always 20°F low, calibration is your friend. If it is 40°F high on Monday, 30°F low on Tuesday, and perfect on Wednesday because apparently it found inner peace, the problem is likely mechanical or electrical. In that case, testing gives you valuable information to share with a repair technician. You can say, “The oven averages 325°F when set to 350°F after six readings,” which is much more useful than “My lasagna has trust issues.”
Conclusion
Testing an oven thermostat is one of the simplest ways to improve cooking results and avoid guessing games. Start with an oven-safe thermometer, test from the center rack, let the oven fully preheat and cycle, average several readings, and compare the result with your set temperature. If the oven is consistently off, calibrate it according to your owner’s manual. If the readings are extreme, unstable, or unchanged after calibration, inspect the sensor, door gasket, heating element, igniter, or control system.
The best part is that this test costs very little and can save you from ruined food, unnecessary repairs, and deeply suspicious brownies. Your oven may not be perfect, but with a proper thermostat test, at least you will know whether it is telling the truth.