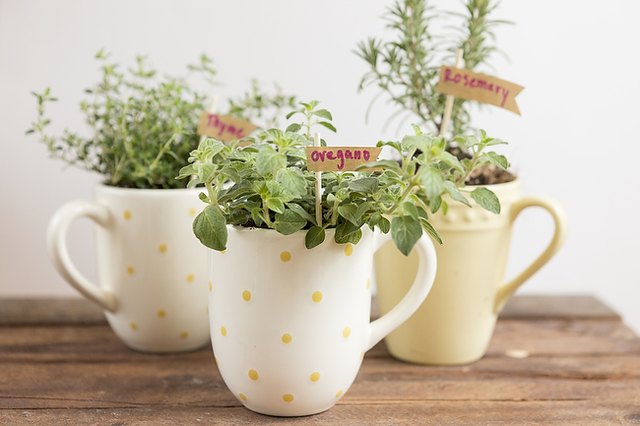
If your kitchen windowsill is giving “I could be useful” energy, a mug herb garden might be exactly the tiny green upgrade it deserves. This project is equal parts practical, charming, and slightly smug in the best way. You get fresh herbs within arm’s reach, you recycle cute mugs instead of letting them gather dust, and your cooking suddenly looks a lot more impressive. Even toast feels fancier when basil is involved.
But let’s be honest: a mug herb garden is adorable only if it actually works. A random spoonful of dirt in a novelty coffee cup does not automatically become a thriving indoor oasis. Herbs have opinions. They want light, drainage, air around their roots, and the right amount of water. Give them that, and they reward you with fragrance, flavor, and the satisfaction of saying, “Yes, I did grow that myself,” while snipping chives over scrambled eggs.
This guide walks you through exactly how to make a mug herb garden that looks good and grows well. You’ll learn which herbs are best, how to plant them, how to avoid soggy-root disasters, and how to keep your tiny container garden productive instead of tragic.
Why a Mug Herb Garden Is Such a Smart Small-Space Idea
A mug herb garden is perfect for people who want fresh herbs without committing to a full raised bed, a giant patio planter, or a backyard that belongs in a magazine. Mugs fit on windowsills, desks, shelves, apartment counters, and even that awkward corner beside the toaster that usually collects junk mail.
They also make herb gardening feel approachable. A mug is small, simple, and unintimidating. You are not building a homestead. You are giving thyme a tiny apartment.
That said, the best mug herb gardens are built with realistic expectations. A mug is small, so it works best for:
- One compact herb per mug
- Young herb plants or starter herbs
- Cut-and-come-again harvesting
- Decorative mini herb collections
- Short-term indoor growing or seasonal displays
If you try to cram rosemary, dill, basil, parsley, and mint into one jumbo souvenir mug, you are not making a garden. You are creating a root-level argument.
Before You Plant: The Most Important Rule Is Drainage
If you remember only one thing from this article, let it be this: herbs hate sitting in wet soil. Most mug herb garden failures happen because the container looks cute but doesn’t drain. Water collects at the bottom, roots stay soggy, and the plant declines while you whisper supportive things at it.
You have two good options:
Option 1: Use a Mug With a Drainage Hole
This is the best setup for a true planted mug herb garden. If your mug already has a drainage hole or can safely be converted into a planter, great. Place it on a saucer so extra water has somewhere to go.
Option 2: Use the Mug as a Cachepot
This is the easiest and most beginner-friendly approach. Instead of planting directly into the mug, place a small plastic nursery pot with drainage inside the mug. From the outside, it still looks like a stylish mug planter. From the inside, your herb gets the drainage it needs. Everyone wins, especially the roots.
If you’re new to indoor herbs, the cachepot method is often the smartest choice. It gives you flexibility, makes watering easier, and reduces the chances of accidental overwatering.
The Best Herbs for a Mug Herb Garden
Not every herb is thrilled about life in a mug. The best choices are compact, useful, and relatively easy to maintain in a small container setup.
Top Picks
- Thyme: Small, tidy, fragrant, and happy with slightly drier soil.
- Chives: Upright, compact, and extremely rewarding for kitchen use.
- Oregano: A strong performer with lots of flavor in a relatively small footprint.
- Parsley: Useful and attractive, though it may need a slightly roomier mug or an inner nursery pot.
- Basil: Great in a larger mug setup, especially if you harvest often to keep it bushy.
- Cilantro: Possible in a mug, but best treated as a short-term crop because it can bolt quickly.
Herbs to Treat Carefully
- Mint: Delicious and energetic. Also a bit of a takeover artist. Give mint its own container and expect to upgrade it quickly.
- Rosemary: Beautiful, but it usually wants more root room and very sharp drainage over time.
- Dill and fennel: Usually too large or awkward for a standard mug garden.
If you want a picture-perfect beginner trio, start with three separate mugs: basil, parsley, and chives. They’re useful, recognizable, and make you feel like the kind of person who says “herb snips” without irony.
What You Need to Make a Mug Herb Garden
- One or more mugs
- A saucer or tray for each mug
- Small herb plants or seeds
- High-quality potting mix or soilless container mix
- A small spoon or hand trowel
- Labels, if you want to be organized and emotionally stable
- A bright window or grow light
Do not use dense garden soil from outside. Container herbs need a loose mix that drains well and allows air around the roots. That one shortcut is not a shortcut. It’s a future problem wearing a cheap disguise.
How to Make a Mug Herb Garden Step by Step
Step 1: Choose the Right Mug
Select a mug that is wide enough to hold a small plant comfortably. Bigger is better, within reason. A large coffee mug works better than an espresso cup because herbs do, in fact, have roots and ambitions.
If the mug has no drainage, plan to use it as a decorative outer container. If it does have drainage, place it on a saucer or tray.
Step 2: Match the Herb to the Container
Choose one herb per mug for the best results. A standard mug is rarely the right place for a mixed planting unless you are using a much larger vessel or treating the setup as temporary. One herb per mug gives you better control over watering, trimming, and plant health.
Example combinations:
- One mug of thyme near a sunny window
- One mug of chives by the kitchen sink
- One mug of basil on the brightest sill in the house
- One separate mug of mint, because mint respects no boundaries
Step 3: Add Potting Mix
Fill the mug or inner nursery pot with moistened potting mix. Leave a little space at the top so water doesn’t spill over every time you water. The soil should feel lightly damp, not soaked like a forgotten sponge.
Step 4: Plant the Herb
If using a transplant, gently loosen the root ball before placing it into the container. Set the plant at the same depth it was growing before. Then fill in around it with potting mix and press lightly to remove large air pockets.
If starting from seed, sow according to the seed packet and remember that patience is part of gardening, even when your mug looks ready for greatness on day one.
Step 5: Water Thoroughly
Give the plant a good drink right after planting. Let extra water drain away fully. Never leave the mug sitting in a puddle for hours. Herbs like moisture, not swamp drama.
Step 6: Place It in Bright Light
Most culinary herbs want at least six hours of direct light a day. Indoors, a south-facing or west-facing window usually works best. If your home doesn’t get strong light, use a grow light. Your herbs do not care whether the light comes from the sun or modern technology. They care about surviving.
How to Care for a Mug Herb Garden
Watering
Watering is where most people either become herb heroes or accidental plant villains. Check the soil before watering. For many herbs, the top half-inch to one inch of mix should feel dry before you water again.
Keep in mind that different herbs like different moisture levels:
- Basil, parsley, and chives generally like more even moisture.
- Thyme, oregano, and rosemary prefer to dry a bit between waterings.
This is another reason one herb per mug is so helpful. You are not trying to make basil and thyme negotiate a peace treaty.
Light
If your herbs start leaning dramatically toward the window, looking pale, or stretching into a lanky mess, they want more light. Rotate the mug every few days for more even growth. If that still doesn’t help, add a grow light for about 12 to 16 hours a day.
Feeding
Herbs do not need heavy feeding. Too much fertilizer can produce a lot of soft growth with weaker flavor. If your plant has been in the same mix for a while, a light dose of diluted fertilizer every few weeks during active growth is plenty.
Pruning and Harvesting
Harvest often. This is not stealing from the plant. It is teamwork. Regular snipping encourages many herbs to branch and stay productive.
Use clean scissors or herb snips and follow these simple rules:
- Take a little and often instead of hacking off everything at once
- Do not remove more than about one-third of the plant at one time
- For basil, snip just above a leaf node to encourage bushier growth
- Pinch off flower buds on basil when they appear if you want more leaves
Common Mug Herb Garden Mistakes to Avoid
1. Using a Mug With No Drainage and Planting Directly Into It
This is the biggest mistake, and yes, it deserves public shaming.
2. Choosing Herbs That Get Too Big
A mug is not a forever home for large, woody, or deep-rooted herbs. Keep the scale realistic.
3. Planting Too Many Herbs Together
Crowded herbs compete for light, water, and root space. Airflow also drops, which can invite disease and general sadness.
4. Watering on a Schedule Instead of Checking the Soil
Your mug herb garden does not know it is “watering day.” Look at the soil. Feel the soil. Trust the soil.
5. Underestimating Light
Many indoor herb failures are actually light failures. A bright room is not the same as direct sun. Herbs can tell the difference, even if your living room insists it’s cheerful.
Creative Mug Herb Garden Ideas
A Kitchen Windowsill Collection
Use three to five mismatched mugs for a cozy, collected look. Try basil, chives, parsley, thyme, and oregano.
A Tea and Cooking Mug Set
Grow mint, lemon balm, and thyme in separate mugs for tea-friendly harvesting. Add basil or parsley nearby for cooking.
A Giftable Mug Herb Garden
Plant one herb in a pretty mug, tie a small tag to the handle, and include a handwritten note with care instructions. It’s charming, useful, and far more memorable than another candle.
A Label-Lover Setup
Use white mugs with chalkboard labels or mini plant stakes. Suddenly your windowsill looks like a tiny test kitchen designed by someone who alphabetizes their spices for sport.
How Long Will a Mug Herb Garden Last?
That depends on the herb, the mug size, your light, and how often you harvest. Some mug herb gardens are best enjoyed as seasonal or short-term container projects. Others can last much longer if you repot as the plant grows.
Think of a mug herb garden as either a charming long-term mini setup for compact herbs or a stylish starter stage before a plant graduates to a bigger pot. Promotion is not failure. It is root-related success.
Real-World Experiences: What Growing a Mug Herb Garden Usually Feels Like
One of the most interesting things about making a mug herb garden is how quickly it changes the way people interact with plants. A large outdoor garden can feel like a weekend project, but a mug herb garden becomes part of your daily routine. It sits where you can see it while making coffee, washing dishes, or scrolling your phone while pretending not to be hungry. Because it is small and visible, you notice everything: new leaves, dry soil, a leaning stem, a sudden burst of growth after a sunny week. That closeness teaches you more than a giant garden ever could.
Many beginners are surprised by how attached they become to a single mug of herbs. A basil plant on the windowsill starts out as décor and turns into a little household personality. You check it in the morning. You rotate it toward the light. You proudly point out new growth to people who did not ask. It is a tiny project, but it feels rewarding because the results are immediate. Snip a few leaves, toss them into pasta or eggs, and suddenly the garden is not theoretical anymore. It is lunch.
Another common experience is realizing that “small” does not mean “zero maintenance.” A mug herb garden is easier than a yard, but it is also less forgiving. Small containers dry out faster, warm up faster, and run out of room faster. That sounds dramatic, but it actually makes you a better gardener. You learn to pay attention instead of relying on autopilot. Over time, most people become much better at reading plants: basil droops and then bounces back after watering, thyme stays happier when left a little drier, and chives respond almost hilariously well to regular trims.
There is also the design side of the experience, which is half the fun. People start with one mug and then, very often, develop opinions. Suddenly you are hunting for matching ceramic mugs at thrift stores, color-coding herbs, or deciding that only vintage stoneware properly honors oregano. The project grows a personality of its own. Even people who are not especially “plant people” enjoy the styling part because a mug herb garden doubles as home décor.
Perhaps the best experience, though, is the way a mug herb garden lowers the pressure. A full garden can make beginners nervous because mistakes feel expensive or public. A mug feels manageable. If one herb fails, you have not ruined summer. You learned something useful in a container the size of a latte. That low-stakes format makes experimentation easier. You try basil one month, thyme the next, maybe parsley after that. You figure out your light, your watering habits, and your favorite herbs to cook with. In that sense, a mug herb garden is not just a cute project. It is often the gateway to becoming a more confident grower, one very small, very fragrant success at a time.
Final Thoughts
If you want a gardening project that is attractive, useful, and beginner-friendly, a mug herb garden is hard to beat. It takes very little space, adds life to your kitchen, and gives you fresh flavor within arm’s reach. The secret is not choosing the cutest mug, though that certainly helps. The real secret is giving your herbs what they actually need: drainage, light, breathable potting mix, and the good sense not to crowd five plants into one tiny cup.
Start simple. Pick one herb, one mug, and one sunny spot. Then water wisely, harvest often, and enjoy the tiny thrill of growing something edible in a container that used to hold coffee. That is a surprisingly good deal.