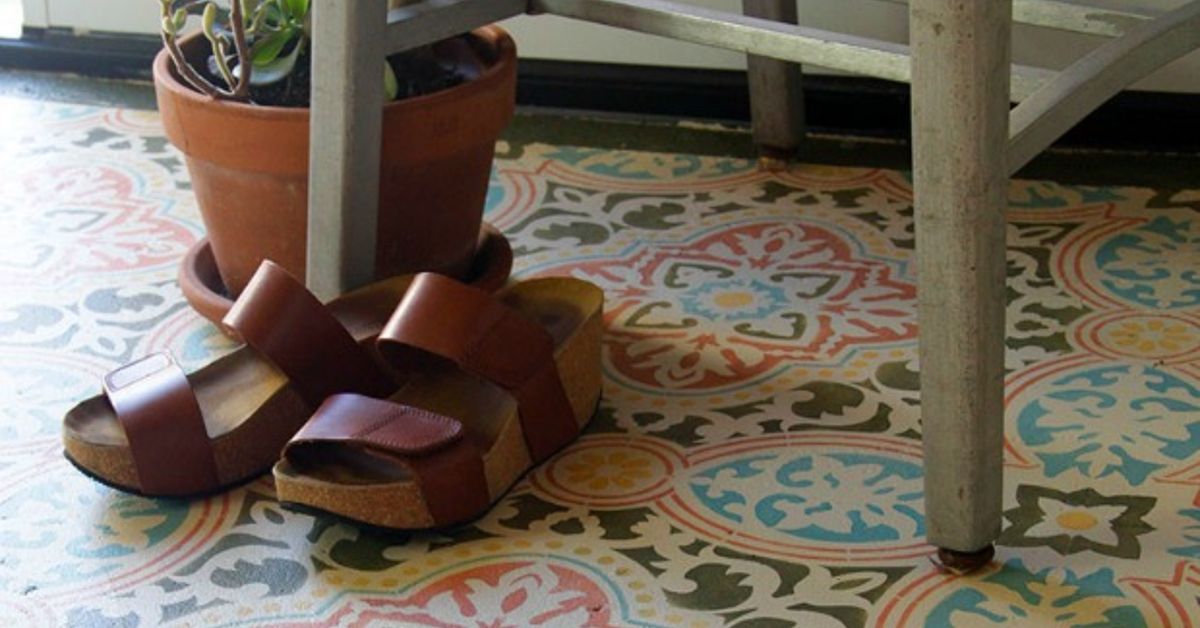
Concrete floors are the sweatpants of home surfaces: practical, dependable, and not always invited to the nice party. But with concrete floor stencils, that plain gray slab can become a patterned patio, a cheerful laundry room, a faux-tile mudroom, or a basement floor that no longer looks like it is waiting for a washing machine to leak on it.
The best part? This is one of those DIY concrete floor makeover projects that looks far more expensive than it is. Instead of tearing out flooring, hiring a crew, or developing a suspiciously close relationship with your local tile aisle, you can use concrete paint, a stencil, a roller, and a little patience to create the look of decorative cement tile, Moroccan patterns, geometric borders, or a painted outdoor rug.
Still, let’s be honest: stenciling concrete is easy, but it is not magic. The stencil will not hide oil stains, peeling paint, dust, moisture problems, or cracks large enough to host a family of ants. A successful concrete stencil project depends on surface preparation, the right paint, careful alignment, and a protective sealer. Do those things well, and your floor will look like a design choice instead of a weekend accident.
Why Concrete Floor Stencils Are Such a Smart DIY Fix
Concrete floor stencils offer a rare combination: low cost, high visual payoff, and enough creative freedom to make your neighbors ask whether you “had someone come in.” You can use them indoors or outdoors, depending on the paint and sealer you choose. Basements, porches, patios, laundry rooms, workshops, sunrooms, and mudrooms are all fair game.
Compared with tile, stenciled concrete is lighter on the budget and easier to customize. Compared with a plain painted floor, a stencil adds movement, personality, and camouflage. That last part matters. A patterned concrete floor can visually soften small discolorations, patched areas, and everyday wear. It will not repair damaged concrete, but it can distract the eye in the same way a patterned shirt distracts from a coffee spill. Interior design: sometimes it is strategy with better lighting.
Best Places to Use Concrete Floor Stencils
Patios and Porches
A stenciled concrete patio can mimic an outdoor rug without the soggy corners, mildew drama, or wind-assisted relocation. Large tile stencils, mandala patterns, and border designs work beautifully outside. For outdoor spaces, choose concrete paint or porch and patio paint made for weather exposure, UV resistance, and foot traffic. Finish with a compatible clear sealer to protect the design from sun, rain, patio chairs, and people who drag patio chairs like they are plowing a field.
Basements
Basement concrete floors are perfect candidates if the slab is dry and in good condition. Before painting, check for moisture. A simple moisture test involves taping plastic to the floor and watching for condensation. If moisture appears, solve that issue first. Paint trapped over moisture can peel, bubble, or behave like it has a personal grudge.
Laundry Rooms and Mudrooms
These spaces are hardworking, messy, and often overlooked. A stencil can turn a utility zone into a feature without using expensive materials. Smaller tile-style patterns are especially effective because they create the illusion of individual tiles. In a mudroom, a black-and-white stencil pattern can look crisp, classic, and forgiving when shoes, bags, and muddy paws enter the chat.
Garages and Workshops
You can stencil garage concrete, but be realistic about abuse. Tires, tools, oil, solvents, and heavy equipment are tougher on coatings than slippers and laundry baskets. Use a coating rated for garage floors, follow curing times carefully, and consider anti-slip additives or textured products where needed. A decorative border may be more practical than an allover delicate pattern in a heavily used garage.
Tools and Materials You Will Need
A concrete floor stencil project does not require a contractor’s truck full of mysterious equipment. Most homeowners can do it with basic painting supplies and a few concrete-specific products.
- Concrete cleaner or degreaser
- Stiff scrub brush or push broom
- Shop vacuum or broom
- Concrete patch or crack filler
- Painter’s tape
- Measuring tape and chalk line
- Concrete bonding primer, if recommended for your surface
- Concrete floor paint, porch and patio paint, or floor-rated acrylic/epoxy coating
- Reusable floor stencil
- Dense foam roller or stencil brush
- Paper towels or cardboard for offloading paint
- Clear concrete-compatible sealer or polyurethane topcoat
- Knee pads, because knees have memories
Step-by-Step Guide: How to Stencil a Concrete Floor
Step 1: Inspect the Concrete
Start by looking closely at the floor. Search for cracks, chips, peeling paint, oily spots, glue residue, loose concrete, and shiny sealed areas. Concrete must be sound before you decorate it. A stencil pattern over failing paint is like putting a bow tie on a raccoon: cute for two seconds, then chaos.
If the floor has old paint that is peeling, scrape or sand it down to a solid edge. If water beads on the surface instead of soaking in, the concrete may be sealed or too smooth for good adhesion. In that case, you may need sanding, grinding, etching, or a manufacturer-approved prep product.
Step 2: Clean Like the Paint Depends on It
Because it does. Sweep or vacuum thoroughly, then scrub with a concrete cleaner or degreaser. Oil, wax, soap film, dust, and dirt can prevent paint from bonding. Rinse well and allow the surface to dry completely. For outdoor concrete, pressure washing can help, but avoid damaging the slab with too much force. The goal is clean concrete, not a miniature canyon system.
Step 3: Repair Cracks and Holes
Fill small cracks with a concrete crack filler or patching compound. Larger cracks may need to be widened slightly, cleaned out, and filled according to product directions. Let repairs cure fully before painting. If you rush this step, the patched area can telegraph through the finish or cause the coating to fail later.
For pitted or badly uneven concrete, a resurfacing product may be necessary before stenciling. Stencils need reasonably smooth contact with the floor. The more texture under the stencil, the more chances paint has to sneak underneath and blur the edges.
Step 4: Test for Moisture and Porosity
Before applying paint, test whether the concrete can accept a coating. Sprinkle a few drops of water on the floor. If the water absorbs quickly, the surface is more likely ready for coating. If it beads, you may need additional surface preparation. For basements or questionable slabs, tape a square of plastic to the floor and check for moisture after several hours. If condensation appears, fix the moisture issue before moving forward.
Step 5: Prime or Base Coat
Some concrete paints are self-priming, while others perform better over a concrete bonding primer. Read the label. This is not the moment to freestyle like a jazz musician with a roller. If your surface is bare, porous, exposed to moisture, or expected to handle heavy traffic, primer can improve adhesion and reduce peeling.
Once the floor is ready, apply the base coat. Many DIYers choose a neutral background color such as white, cream, charcoal, tan, or soft gray. For a faux cement tile look, a matte or low-luster finish often appears more natural than glossy paint. Use a roller for the main area and a brush for edges. Let the base coat dry according to the product label, usually at least overnight and often longer before stenciling.
Step 6: Plan the Pattern Layout
Measure the room or patio and snap chalk lines to create a guide. You can start in the center for a balanced pattern, at the most visible entrance for a clean first impression, or along a straight wall if the space is small. Dry-fit the stencil before painting to see how the pattern lands at edges and corners.
This step saves heartache. Nothing ruins a DIY victory lap like discovering the final row is a weird sliver that looks like the pattern got scared and ran away.
Step 7: Secure the Stencil
Place the stencil along your guide line and secure it with painter’s tape. On textured concrete, a low-tack repositionable spray adhesive can help hold the stencil flat and reduce paint bleed. Use it lightly and follow the adhesive instructions. Too much adhesive can leave residue, and residue is not the souvenir you want from this project.
Step 8: Use Less Paint Than You Think
The secret to crisp stencil lines is restraint. Load a dense foam roller or stencil brush, then offload excess paint onto cardboard or paper towels until the tool looks almost too dry. Apply light coats instead of one heavy coat. If you press hard or use a wet roller, paint can seep under the stencil edges.
Roll gently in the direction of the stencil openings or pounce straight up and down with a stencil brush. Lift the stencil carefully, then move to the next repeat. Align registration marks or edges with the previous design. Work slowly enough to stay accurate, but not so slowly that you begin naming each square and forming emotional attachments.
Step 9: Handle Edges and Corners
Edges are the trickiest part of a concrete floor stencil project. You may need to bend the stencil slightly, cut a duplicate stencil for tight spots, or use a small stencil brush near walls. If a full repeat does not fit, partial motifs can still look intentional. The key is consistency. A slightly imperfect edge hidden by baseboards, furniture, or planters is not a disaster. It is character with plausible deniability.
Step 10: Touch Up Before Sealing
Once the stencil paint dries, inspect the floor. Use a small artist’s brush to sharpen lines or cover small bleeds with the base color. Baby wipes can sometimes remove fresh paint smudges before they dry, but test first. Do not chase perfection forever. A handmade painted floor should look crafted, not printed by a robot in a sterile lab.
Step 11: Seal the Design
Sealing is what turns your painted concrete stencil from “pretty project” into “usable floor.” Choose a clear topcoat compatible with your paint and location. Outdoor projects need exterior-rated protection. Interior floors need a durable finish that can handle foot traffic. Apply thin, even coats and allow proper drying time between coats.
For wet areas or outdoor patios, consider slip resistance. Glossy sealers can look beautiful, but they may become slick when wet. A low-luster sealer or anti-slip additive can help keep the floor safer.
Concrete Floor Stencil Design Ideas
Faux Cement Tile
This is the crowd favorite for a reason. A repeating square tile stencil can make concrete look like expensive encaustic tile. Try navy and white for a coastal feel, charcoal and cream for farmhouse style, or terracotta and ivory for a warm Mediterranean look.
Painted Outdoor Rug
Instead of covering an entire patio, stencil a rectangle under a seating area. Add a border around the edge to mimic a rug. This works beautifully on porches and patios where you want a focal point without painting every inch of concrete.
Geometric Modern Pattern
Diamonds, hexagons, arches, and repeating linework can make a basement or garage feel more contemporary. Keep the palette simple: black and white, gray and white, or tan and cream. The pattern brings the drama; the colors do not need to shout.
Border-Only Stencil
If you are nervous about an allover pattern, stencil only the perimeter of the floor or the edges of a patio. A border adds style while reducing labor. It also gives you more forgiveness in high-traffic center areas.
Common Mistakes to Avoid
Skipping Surface Prep
Most failed painted concrete floors fail before the paint can even show off. Dirty, sealed, damp, or crumbling concrete will not hold a coating well. Prep is not glamorous, but neither is watching paint peel like a bad sunburn.
Using Wall Paint
Wall paint belongs on walls. Concrete floors need paint made for floors, patios, porches, garages, or concrete surfaces. Floor-rated coatings are formulated to resist wear, abrasion, and foot traffic.
Overloading the Roller
Too much paint causes blurry stencil edges. Use a dry-brush or dry-roller technique. It may feel slow at first, but it saves time on touch-ups.
Not Letting Paint Cure
Dry and cured are not the same thing. Paint may feel dry to the touch long before it is ready for furniture, rugs, shoes, or car tires. Follow the product’s cure time before returning the space to normal use.
How to Maintain a Stenciled Concrete Floor
Maintenance is simple, but it matters. Sweep regularly to remove grit that can scratch the sealer. Clean with mild soap and water rather than harsh chemicals. Use furniture pads under chair legs and tables. For outdoor floors, rinse dirt and leaves away before they stain. Depending on traffic and weather exposure, reseal the floor periodically to refresh protection.
If a small area chips, do not panic. Lightly sand the damaged spot, clean it, touch up the base and stencil color, and reseal. Keep leftover paint labeled and stored properly. Future you will be grateful, and future you is already dealing with enough.
Budget and Time Expectations
The cost of concrete floor stencils depends on the size of the space, the quality of paint, and whether you already own supplies. A small laundry room or entry area may require only one stencil, one or two paint colors, primer, and sealer. A large patio will need more paint, more sealer, and more snacks.
Plan for at least a weekend, and possibly several days when drying and curing times are included. Day one may be cleaning and repairs. Day two may be base coat. Day three may be stenciling. Day four may be sealing. The actual painting can be quick; the waiting is where DIYers are tested spiritually.
Real-World Experience: What a Concrete Stencil Weekend Actually Feels Like
Here is the honest version of a concrete floor stencil project: it begins with optimism, becomes suspiciously dusty, briefly turns into a yoga class for people holding paint rollers, and ends with you standing in the doorway saying, “Wait, did I actually do that?”
The first experience most DIYers have is that concrete is dirtier than it looks. A floor can appear clean until you scrub it and discover a whole hidden ecosystem of dust, old paint powder, pet hair, and mysterious garage residue. The best move is to clean twice. Sweep, scrub, rinse, dry, then vacuum again. It feels excessive until the first coat goes on smoothly and you realize the boring prep work was quietly doing hero work.
The second big lesson is that stencil paint behaves better when you barely use any. Beginners often load the roller like they are painting a bedroom wall. That creates bleeding under the stencil, especially on textured concrete. The better method feels wrong at first: dip lightly, roll off most of the paint, then build the color in thin passes. You may think, “There is no way this is enough paint.” That is usually when you are finally doing it correctly.
Alignment is another place where patience pays off. A chalk line can feel old-fashioned, but it is the difference between a polished pattern and a floor that slowly drifts sideways like a shopping cart with one bad wheel. Start with the most visible area and keep checking your repeat. If the stencil has registration marks, use them. If it does not, mark your own guides with small pieces of tape.
One surprisingly helpful habit is cleaning the stencil as you go. Dried paint can build up on the back and edges, preventing the stencil from lying flat. When that happens, the pattern gets fuzzier. Keep a damp rag nearby and pause occasionally to wipe the stencil. Yes, it interrupts the rhythm. No, you will not regret it.
Touch-ups are part of the process, not proof that you failed. A tiny bleed here, a slightly pale corner there, a repeat that landed a hair off near the wallthese things happen. Once the full floor is sealed and the room is put back together, most small flaws disappear into the overall pattern. The human eye reads the finished design as a whole, not as a forensic investigation.
The best practical advice is to protect your body as much as your floor. Wear knee pads. Take breaks. Keep water nearby. Do not stencil yourself into a corner unless you enjoy dramatic exits. Work backward toward a doorway, and make a plan for where tools, paint trays, and wet stencils will sit. Concrete floors are unforgiving, and your lower back will file a complaint if you ignore ergonomics.
Finally, sealing changes everything. Before sealer, the floor looks finished but vulnerable. After sealer, the colors deepen slightly, the surface feels more unified, and the project looks intentional. Let the sealer cure before dragging furniture back. The hardest part of the entire project may be waiting, but it is cheaper than repainting scuffed chair marks because impatience won.
Conclusion
Concrete floor stencils are one of the easiest ways to turn a plain slab into a custom design feature. They are affordable, flexible, and beginner-friendly when you respect the process. The winning formula is simple: clean the concrete thoroughly, repair damage, test for moisture and porosity, use the right floor paint, stencil with light coats, and seal the finished design.
Whether you want a faux tile laundry room, a stylish basement, a painted patio rug, or a porch that finally has personality, stenciled concrete gives you designer impact without the designer invoice. It is not a five-minute fix, but it is absolutely a doable DIY fix. And when someone compliments the floor, you get the rare pleasure of saying, “Thanks, I painted it myself,” while pretending you did not spend half the weekend crawling around with a foam roller and snacks in your pocket.