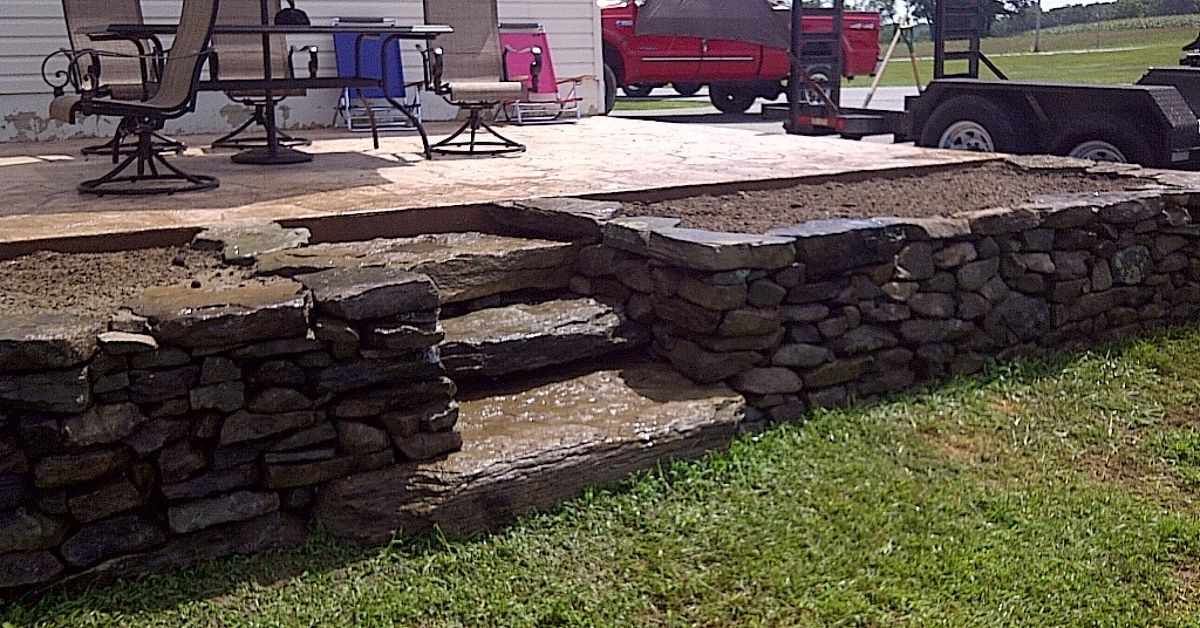
A dry-stack stone raised bed is the gardening equivalent of showing up to a potluck with homemade pie instead of
store-bought cookies. Both work. One makes people whisper, “Okay, fancy.” It’s a raised bed built with stacked stone
(no mortar), using weight, friction, and smart drainage to stay put while your tomatoes do their best impression of a
jungle vine.
In this guide, you’ll get a clear plan, a step-by-step build, and the “please don’t do this” mistakes that make
stone beds lean like they’re trying to hear gossip over the fence.
What is a dry-stack stone raised bed?
“Dry-stack” (also called dry-laid) means the stones are stacked without mortar. The wall works because:
the base is stable and level, the wall face leans slightly back (a subtle “batter”), stones overlap like bricks,
and water can escape instead of building up pressure behind the wall.
For gardening, the stone wall usually acts as a low retaining structureoften 8 to 24 inches tallcontaining soil
and shaping the planting area. When you keep the height reasonable and manage drainage, dry-stacked stone is
durable, repairable, and ridiculously good-looking.
Why choose stone instead of wood or metal?
Stone bed perks
- Long life: Stone doesn’t rot, warp, or become a termite buffet.
- Stays cooler in summer heat: Stones can buffer temperature swings near the bed edges.
- Looks intentional: Even when your basil is “thriving” (read: chaotic), the bed looks composed.
- Easy to repair: If something shifts, you can restack a sectionno demolition saga required.
The honest tradeoffs
- It’s heavy work: You’re basically doing functional sculpture with rocks.
- It takes patience: Dry-stack is more like playing Tetris than nailing boards.
- Drainage details matter: Water pressure is the #1 villain for retaining walls, even small ones.
Planning: size, location, and “how tall is too tall?”
Pick a bed size that’s easy to reach
A classic guideline is keeping beds around 3–4 feet wide so you can reach the center without stepping into the soil
(compaction is a plant’s least favorite hobby). Length can be whatever your space allows4x8 is popular because it’s
productive without turning gardening into an endurance sport.
How tall should the stone wall be?
Most vegetable roots are happy with about 6–12 inches of good soil depth, and many common veggie beds land in the
10–12 inch range (deeper for larger plants and hot/windy spots that dry out faster). If your raised bed is shallower
than about 12 inches, it’s typically best to keep the bottom open to native soil so roots can keep going downward.
For dry-stacked stone: stay conservative. If you’re building a low bed wall (under ~2 feet), you’re in
DIY-friendly territoryespecially on level ground. Once you start creeping toward “real retaining wall” height,
you may need reinforcement, drainage design, or professional help, depending on soil, slope, and what’s being
retained.
Sun, slope, and water
- Sun: Veggies generally want 6–8 hours of direct sun. Place beds away from heavy shade.
- Slope: A gentle slope is manageable. A steep slope turns your “raised bed” into a retaining wall project.
- Water: Don’t site a bed where water pools after rain. If you see puddles that linger, fix drainage first.
Stone choices that make building easier
Dry-stacking goes smoother when stones have at least one reasonably flat face. Common choices include fieldstone,
ledge stone, and flat-ish local stone. Whatever you use, aim for:
- Big “base” stones for the first course (the foundation layer).
- Medium face stones that can overlap joints and lock together.
- Smaller “hearting” stone (chips/hand-sized pieces) for packing voids inside the wall.
- Capstones (flatter, wider stones) for the topmore on this later.
Avoid smooth, round river rock for the wall itself. Round stones don’t interlock well, and your wall will behave like
a shopping cart with one bad wheel.
Tools & materials checklist
- Stones (base stones, face stones, capstones, small packing stones)
- Shovel, trenching shovel, and/or mattock
- Hand tamper (or plate compactor for bigger builds)
- Level (2–4 ft), string line, and stakes
- Crushed stone (angular) for base (often 3/4″ minus or similar compactable aggregate)
- Clean angular gravel for drainage/backfill behind the stone (not rounded)
- Landscape fabric (filter fabric) to separate soil from drainage gravel
- Wheelbarrow, gloves, and a rock bar (your new best friend)
- Optional: hardware cloth (to deter burrowing pests), cardboard/newspaper (weed suppression)
How to build a dry-stack stone raised bed (step by step)
Step 1: Layout like a pro (even if you’re not one)
Mark the bed footprint with stakes and string. Check for square by measuring diagonals (if diagonals match, you’re
square). Then decide wall thickness: a thicker base is more stable and forgiving.
Pro tip: dry-stack looks best when the bed outline is simplerectangle, gentle curve, or a tidy terrace. “Abstract
squiggle” is harder to stack and oddly hard to explain to guests.
Step 2: Dig a footing trench and prep the base
For a low garden wall, you’re typically digging a shallow trench where the wall will sit. The goal is to reach firm,
undisturbed soil (or at least remove loose organic top layer), then build a compacted crushed-stone base.
- Trench width: wider than your wall so you have room to set stones and adjust.
- Depth: enough for a compacted base plus burying part of the first course. Burying the first course helps resist shifting.
- Base layer: add crushed stone in lifts (thin layers) and compact each layer until solid.
If you live in a freeze–thaw climate, frost heave can move hardscape. For taller walls, footing depth and frost-line
considerations become more important. For a typical low raised bed, the “win” is a well-compacted, free-draining base
and a wall that can flex slightly rather than crack.
Step 3: Set the first course (this is where the wall earns its confidence)
Place your biggest, most stable stones first. Take time here. A wobbly first course is like building a layer cake on
a skateboard.
- Set stones on the compacted base and check level front-to-back and side-to-side.
- Keep the face line tidy with your string line.
- Shim with small stone chips (not soil) to stabilize.
Step 4: Build upward with overlap and a slight backward lean
Dry-stacked walls typically lean back slightly toward the soil they’re holding (the “batter”). In practice, that
means each course is set a hair behind the one below. This small tilt helps the wall resist outward pressure.
- Stagger joints: don’t stack vertical seams; overlap like brickwork.
- Use hearting: pack interior voids with small stones so face stones don’t wobble.
- Include tie stones: every so often, use a longer stone that reaches into the wall mass to “stitch” it together.
- Check often: step back and sight along the wall. Catching a lean early is much easier than fixing it later.
Step 5: Manage water like it’s your job
Water pressure is a major reason retaining walls fail. Even with a low bed, you want water to drain away rather than
build up behind the stones.
- Drainage gravel behind the wall: add a band of clean, angular gravel behind the stones.
- Filter fabric: place fabric between gravel and soil to keep fine soil from clogging drainage.
- Consider a drainpipe: if the site is wet, or the bed is on a slope, a small perforated pipe can move water away.
If your bed is basically freestanding on flat ground and not acting as a serious retaining wall, your drainage needs
may be simpler. But if the bed is cut into a slope (terrace style), treat it like a retaining wall and don’t skip the
drainage details.
Step 6: Cap it like you mean it
Capstones do three things: they lock the top course together, give you a comfortable edge to lean on, and make the
whole project look finished. Choose flatter stones for the cap. Aim for good coverage with minimal long, continuous
joints.
Want a chef’s-kiss detail? Slightly overhang capstones toward the inside of the bed so runoff sheds inward rather
than down the outside face.
Filling the raised bed: what goes inside (and what shouldn’t)
Should you put gravel at the bottom?
Usually: no. A thick gravel layer under soil is often thought to “improve drainage,” but it can create a perched
water table effect where water sits above the interface instead of draining freely. For beds on native soil, a better
approach is: loosen/till the ground below, keep the bottom open, and use a well-structured soil mix.
Better bottom layers
- Cardboard/newspaper: helps smother weeds and grass beneath the bed (biodegradable).
- Hardware cloth: helps deter burrowing pests (especially if voles are basically your local wildlife mascot).
- Organic fillers (optional for deep beds): sticks/twigs/leaves can reduce soil volume needed, but expect settling over time.
A solid soil mix (simple and effective)
Raised-bed soils should be light, well-drained, and rich in organic matter. A common, practical approach is combining
topsoil, compost (or well-rotted manure), and a drainage/aeration component like coarse sand or similar materials.
Different extension services recommend slightly different ratios, but the theme is consistent: structure + organic
matter + aeration.
- Easy mix for many gardens: equal parts topsoil + compost + coarse sand (or comparable aeration component).
- Compost-forward option: roughly 1:1 compost and soilless mix; add some topsoil (often limited) if the bed is deep enough for structure.
- Clay soil fix: increase organic matter and add a coarse component to improve drainage and root penetration.
If you’re importing topsoil or compost, think safety: avoid materials that may carry contaminants (like lead) or
immature compost that’s still “hot.”
Planting and maintenance tips that keep the bed happy
- Watering: Raised beds dry out faster than in-ground gardens, especially in wind and full sun. Consider drip irrigation.
- Mulch: A 1–2 inch layer of mulch reduces evaporation and helps prevent splash and soil crusting.
- Annual top-off: Compost settles and breaks down. Plan to top-dress with compost each season.
- Stone touch-ups: If a stone loosens, pull it, re-pack with small stones, and reset it. Dry-stack is forgiving.
Common mistakes (so you don’t become a cautionary tale)
1) Building on soft, uncompacted ground
If the base isn’t stable, the wall will settle unevenly. That’s when cracks appear, caps wobble, and you start
side-eyeing the whole project like it betrayed you.
2) Going vertical instead of using a slight batter
A perfectly vertical dry-stack face is more likely to tip. A small lean back is subtle, attractive, and structurally
smarter.
3) Long vertical seams
Stacked joints create weak “fault lines.” Staggering joints improves strength and looks more natural.
4) No drainage plan
Water pressure is sneaky. The bed might look fine all summer… then one heavy rain turns your wall into modern art.
5) Filling the bottom with gravel “for drainage”
This is a classic myth that lingers like a bad pop song. In many cases, it makes drainage worse by holding water in
the soil layer above.
Two example builds you can copy
Example A: A 4×8 vegetable bed, 12 inches tall
This is the sweet spot: easy reach, good soil depth, and a wall height that’s approachable for DIY. Use a compacted
crushed-stone base, bury part of the first course, build two to three courses depending on stone size, then cap with
flat stones. Fill with a balanced soil/compost mix. Add drip irrigation, and you’ll wonder why you didn’t do this
sooner.
Example B: A terraced herb bed on a gentle slope
Cut a level “shelf” into the slope for the bed, and treat the front edge as a low retaining wall: add drainage gravel
and fabric behind the stones, include tie stones, and keep the wall height conservative. Plant thyme, oregano, and
creeping rosemary along the top edge so the herbs soften the stone and smell amazing when brushed.
Real-world experiences building a drystack stone raised bed (about )
The first time I built a dry-stack stone raised bed, I thought the hard part would be the digging. I was wrong.
Digging is just a warm-up act. The real show begins when you start choosing stones and realize every rock has a
personalitysome are cooperative, some are dramatic, and one is always shaped like a potato and refuses to sit still.
My biggest lesson: spend more time on the first course than you think is reasonable. The base stones are like
foundation teethif they’re crooked, everything above them smiles weird. I set a timer once to “keep moving,” and all
it did was make me faster at making mistakes. Now I go slow: place, test, tap, re-place, and only then move on.
The wall ends up straighter, and I end up less cranky.
Second lesson: sort stones before you stack. I used to grab whatever was closest and wonder why progress felt like
wrestling. Now I make piles: big base stones, medium face stones, flat cap candidates, and small hearting rocks.
Suddenly the build feels like assembling something on purpose instead of improvising a geology-themed escape room.
Third lesson: “pretty” stones are not always “structural” stones. A gorgeous flat rock might be perfect as a capstone
but terrible in the middle if it creates a long joint. Conversely, an ugly lumpy stone might lock two others together
like it was born for the job. This is why dry-stack is oddly satisfyingyou’re not forcing materials into place; you’re
finding the right relationships between them. It’s basically friendship, but heavier.
Drainage is the quiet hero of the whole project. On one bed, I skipped the fabric behind the wall because I was tired
and told myself, “It’s only a raised bed.” A year later, soil had migrated into the drainage space and the face stones
started to loosen after big rains. Fixing it wasn’t impossibledry-stack is forgivingbut I had to pull back stones,
rebuild the backfill, and promise myself I’d never cheap out on the boring parts again.
Finally, expect the bed to “settle into itself.” Soil settles, organic fillers break down, and stones may shift a
hair with freeze–thaw cycles. That’s not failure; that’s the system doing what it does. I now do a quick spring
inspection: wiggle-check a few stones, top off soil with compost, and reset anything that feels loose. It takes an
hour and saves me from a mid-season “why is this leaning?” conversation with my own garden.
The payoff is worth it. A dry-stack stone raised bed feels permanent in the best waylike it belongs to the property.
And when the plants spill over the capstones in summer, it looks less like a construction project and more like a
little ecosystem you built with your hands (and your back, and your wheelbarrow, and possibly a few new swear words).
Conclusion
A drystack stone raised bed is part garden, part craftsmanship. Keep the wall low and stable, build on a compacted
base, overlap joints, include tie stones, and give water an easy way out. Fill with a well-structured soil mix, plan
for a little seasonal settling, and you’ll have a raised bed that gets better-looking every yearunlike your phone
battery.