Note: The best haunted house is spooky, not stressful. Keep walkways clear, use battery-powered lights instead of open flames, and avoid decorations that could trip trick-or-treaters, guests, pets, or Uncle Gary after his third apple cider.
Halloween is the one time of year when cobwebs are not a housekeeping failure. They are interior design. A crooked picture frame becomes “haunted Victorian estate.” A pile of leaves becomes “abandoned graveyard.” A plastic skeleton wearing sunglasses becomes “someone who clearly died having a better social life than the rest of us.”
Creating DIY Halloween decorations does not require a giant budget, a professional haunted-house crew, or a mysterious basement laboratory. With a few inexpensive materials, some clever lighting, and a willingness to hot-glue things while dramatically whispering “it lives,” you can turn an ordinary home into a memorable haunted house.
This guide walks through indoor Halloween decorations, outdoor haunted house ideas, creepy lighting tricks, easy DIY projects, and practical tips for making your space eerie without making it impossible for people to safely reach the candy bowl.
Start With a Haunted House Theme
The fastest way to make Halloween decorations look intentional is to choose a theme before buying supplies. A haunted house feels more convincing when every room looks like it belongs to the same spooky story.
Instead of mixing pirates, zombies, skeleton flamingos, witches, giant spiders, and a random inflatable dinosaur wearing a vampire cape, create one central mood. Think of your home as a low-budget horror movie set where you are both director and exhausted prop department.
Popular DIY Halloween Decorating Themes
- Haunted Victorian Mansion: Dusty frames, black lace, old books, flickering candles, portraits with spooky eyes, and dark floral arrangements.
- Abandoned Graveyard: Foam tombstones, moss, skeleton bones, fog, ravens, and crooked fencing.
- Witch’s Cottage: Potion bottles, broomsticks, black cauldrons, hanging herbs, fake spiders, and glowing green lights.
- Monster Laboratory: Jars of “specimens,” bubbling bottles, warning labels, colored lights, and fake electrical experiments.
- Family-Friendly Ghost House: Paper bats, floating ghosts, smiling pumpkins, silly skeleton scenes, and friendly monsters.
- Haunted Carnival: Vintage signs, striped fabric, creepy dolls, old music, ticket booths, and clown-free zones if you value household peace.
Once you choose a theme, repeat a few key colors throughout the home. Black, orange, dark green, purple, gray, burgundy, bone white, and metallic gold all work well. Repeating colors makes inexpensive Halloween decorations feel more polished and less like a craft-store aisle exploded in your living room.
Create a Spooky Front Entrance
Your front porch is the movie trailer for your haunted house. It sets expectations before guests even ring the bell. You do not need a giant animatronic monster to make an impact. A strong entrance usually combines height, texture, lighting, and one or two surprise details.
Build a Creepy Halloween Front Door
Turn your front door into a haunted focal point using removable materials. Cover it with black plastic tablecloths, dark fabric, kraft paper, or temporary boards made from cardboard. Add a “Keep Out” sign, paper bats, fake cobwebs, and a wreath made from dried branches, black leaves, or plastic ravens.
For a more dramatic effect, make your door appear boarded up. Cut cardboard into uneven plank shapes, paint them brown or gray, and attach them with removable adhesive. Add a few paper handprints, fake caution tape, or a sign that reads “Definitely Not Haunted.” Nothing says haunted quite like a sign insisting otherwise.
Use Pumpkin Displays That Look Intentional
Pumpkins are classic Halloween decorations, but they become more interesting when grouped together instead of scattered like lost orange bowling balls. Create clusters using different sizes, shapes, and colors. Mix carved pumpkins with painted pumpkins, faux pumpkins, gourds, black lanterns, and fall leaves.
Try a no-carve pumpkin display if you want decorations that last longer. Paint pumpkins matte black, white, gold, or dark green. Add spiders, decals, black lace, fake insects, or handwritten labels such as “Potion Ingredients,” “Beware,” and “Probably Fine.” Battery-operated tea lights give carved pumpkins a spooky glow without relying on open flames.
Make a DIY Graveyard
A haunted graveyard is one of the easiest outdoor Halloween decoration ideas because it works in large yards, small lawns, patios, and even apartment balconies. Cut tombstone shapes from insulation foam, thick cardboard, or lightweight wood. Paint them gray, then dry-brush black paint around the edges for an aged stone effect.
Add funny tombstone names for a playful touch. “Barry D. Alive,” “I. M. Gone,” “R.I.P. Wi-Fi,” and “Here Lies My Motivation” are easy crowd-pleasers. Place a few skeleton bones near the graves, add moss around the bases, and lean the tombstones at uneven angles. Perfect symmetry is for real cemeteries and grocery-store displays.
Use Lighting to Make Ordinary Decorations Look Creepy
Lighting is the secret ingredient that turns a collection of decorations into a haunted atmosphere. The same plastic skeleton can look silly in bright daylight and deeply suspicious under purple uplighting at night.
Use LED string lights, battery-operated candles, lanterns, colored bulbs, and spotlights to create layers of shadows. Purple, green, orange, and red lighting work especially well for Halloween scenes. Aim lights upward at trees, walls, props, or tombstones for a dramatic effect.
Easy Halloween Lighting Ideas
- Place battery-powered candles inside lanterns, pumpkins, and glass jars.
- Use orange string lights inside a cauldron filled with crumpled cellophane to create fake fire.
- Shine a green spotlight onto a witch display or bubbling potion table.
- Hang fairy lights behind cheesecloth for a floating ghost effect.
- Use a flashlight behind window silhouettes to make bats, hands, or monsters appear after dark.
- Put colored lights inside translucent plastic bottles for a mad-scientist laboratory look.
Keep lights away from dry leaves, fabric, paper decorations, and crowded walkways. Fire-safety guidance for Halloween consistently recommends keeping exits clear, maintaining working smoke alarms, and choosing battery-operated candles or glow sticks instead of open flames.
DIY Halloween Decorations for Inside the House
Once visitors step inside, your haunted house should feel like it has secrets. You do not need to decorate every square inch. Focus on high-impact spaces: the entryway, hallway, mantel, dining table, staircase, windows, and bathroom.
Turn a Hallway Into a Haunted Passage
Hallways are perfect for haunted house decorating because they naturally create suspense. Cover walls with black fabric, dark sheets, or temporary plastic tablecloths. Add gauze, fake cobwebs, paper bats, and framed “haunted portraits.”
For the portraits, print old-fashioned black-and-white faces or use thrift-store frames. Replace the artwork with creepy photos, fake family portraits, or images with glowing eyes. A small LED puck light hidden behind the frame can create an unsettling glow.
Hang paper bats in a flying pattern across the wall or ceiling. The trick is to vary the size and angle of the bats. When every bat is perfectly straight, they look less like a swarm and more like they are waiting for a group photo.
Make Floating Ghosts From Simple Materials
Floating ghosts are one of the most reliable DIY Halloween decorations because they are inexpensive, lightweight, and easy to customize. Use white fabric, cheesecloth, old sheets, plastic tablecloths, or gauzy curtains. Drape the material over a balloon, foam ball, tomato cage, wire form, or upside-down plastic cup.
Draw eyes with black marker, glue on felt circles, or leave the faces blank for a more mysterious effect. Hang the ghosts from porch ceilings, tree branches, curtain rods, or door frames using fishing line. The clear line helps them appear to float, especially when lit from below.
Create Creepy Window Silhouettes
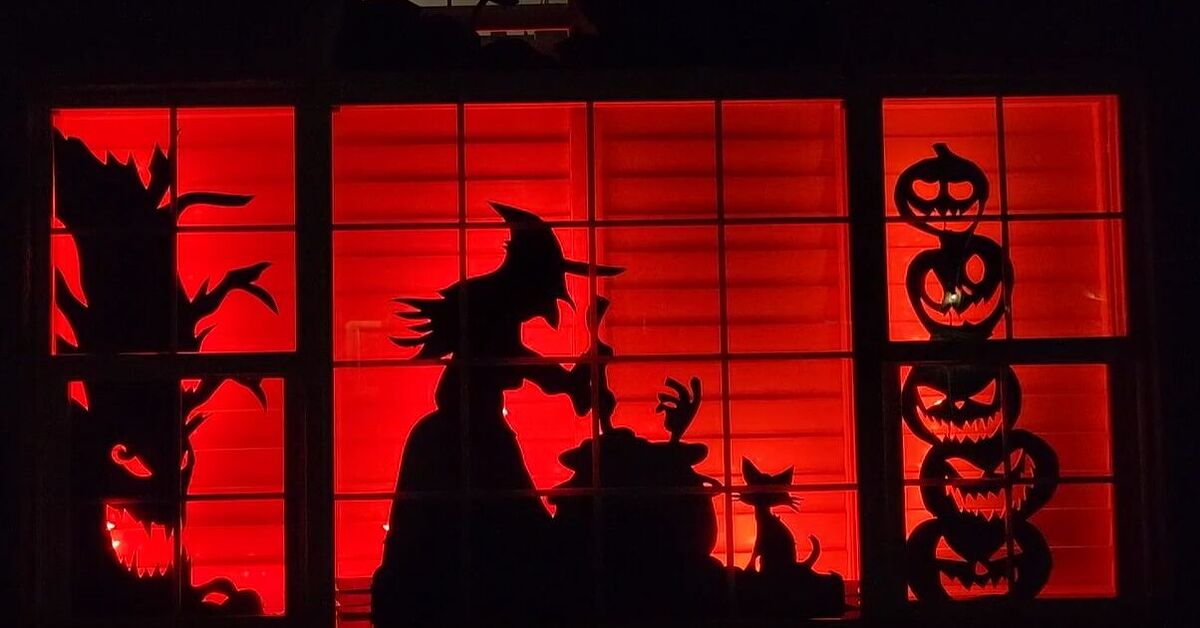
Halloween window decorations are simple but highly effective because they work from both inside and outside. Cut bats, cats, spiders, hands, monsters, witches, or haunted-house shapes from black cardstock or construction paper. Tape them to the inside of your windows.
For larger windows, create a full silhouette scene. A witch stirring a cauldron, a giant spider crawling across a window, or shadowy hands pressing against glass can make a huge impact with almost no supplies. Add a light behind the window to help the shapes stand out after sunset.
Make a Witch’s Potion Station
A witch’s potion station is a flexible project that works on a dining table, mantel, bookshelf, kitchen counter, or front porch. Start with a black tablecloth, dark runner, or piece of burlap. Then layer jars, bottles, cauldrons, candles, fake moss, old books, branches, and plastic insects.
Save glass jars throughout the year, remove the labels, and fill them with colored water, plastic bugs, dried leaves, marbles, or fake eyeballs. Create labels with names such as “Dragon Tears,” “Werewolf Fur,” “Goblin Snacks,” “Moon Dust,” and “Unicorn Regret.”
For a bubbling cauldron, place a small bowl or container inside a large black cauldron. Add green cellophane, plastic bubbles, and battery-powered lights. You can also tuck a small fan under lightweight fabric for movement. Avoid using dry ice indoors unless you understand the ventilation and handling requirements. A glowing cauldron is fun; turning your kitchen into a science experiment is less charming.
Use Texture to Make Decorations Feel More Real
The best haunted house decorations usually involve texture. Smooth plastic props can look flat on their own, but add cheesecloth, moss, branches, dried leaves, torn fabric, old books, rope, burlap, or weathered wood, and suddenly the scene feels more believable.
Stretch fake cobwebs thin instead of leaving them in thick cotton clumps. Pull them apart until they look like actual webs drifting across bushes, picture frames, railings, and planters. Add a few oversized plastic spiders, but do not put one directly above the candy bowl unless you enjoy listening to children scream at a pitch only dogs can hear.
Bring in natural elements such as fallen branches, pinecones, dried flowers, leaves, and moss. These materials make a display look more atmospheric while keeping costs low. Dark branches in a tall vase can become a haunted forest centerpiece. Dried flowers can become a witchy bouquet. A pile of leaves can hide extension cords, prop bases, or the evidence that your lawn has not been raked since September.
Set Up Sound and Movement
A haunted house should engage more than the eyes. Sound and movement make even simple decorations feel alive. You do not need loud jump scares or theatrical fog machines to create suspense. A subtle soundtrack can be more effective than a full-volume monster roar.
Easy Halloween Sound Effects
- Play soft thunder, wind, creaking doors, whispers, crows, or distant footsteps from a hidden speaker.
- Use a playlist of eerie instrumental music near the entrance.
- Hide a small Bluetooth speaker behind tombstones, furniture, or plants.
- Add a motion-activated sound prop near the front door.
- Use wind chimes, hanging chains, or lightweight branches for natural movement outdoors.
Keep the volume reasonable, especially if you live close to neighbors. A haunted house should make people nervous in a fun way, not make the entire block consider a noise complaint.
Decorate Room by Room Without Overspending
The most budget-friendly Halloween decorating strategy is to create “zones.” Instead of buying decorations for every room, choose three or four areas that will carry the theme. A decorated front porch, entryway, hallway, and mantel can make the entire home feel transformed.
Budget DIY Halloween Decorating Plan
- Choose one theme and two or three main colors.
- Decorate the front door or porch first.
- Add lighting before buying more props.
- Use paper bats, cheesecloth, jars, branches, and recycled cardboard for inexpensive filler decorations.
- Create one “wow” feature, such as a graveyard, giant spiderweb, floating ghosts, or witch’s potion station.
- Reuse the same decorations in different rooms every year by changing their arrangement.
DIY Halloween decorations can look expensive when they are layered thoughtfully. A few large props, a handful of lights, and plenty of texture usually work better than dozens of tiny decorations placed everywhere. Think haunted mansion, not discount-store scavenger hunt.
Safety Tips for a Haunted House Display
Halloween decorating should be spooky, not hazardous. Before guests arrive, walk through your display after dark. Check that steps, sidewalks, exits, and the path to the candy bowl are visible and clear.
- Use battery-operated candles, LED lights, or glow sticks instead of real candles.
- Keep extension cords secured and away from walkways.
- Anchor outdoor props so wind does not turn them into flying Halloween projectiles.
- Keep exits and doors clear of fabric, decorations, and furniture.
- Choose weather-resistant outdoor lighting and check cords before use.
- Keep fragile glass props away from areas where children or pets may bump them.
- Make the candy area easy to find and brightly enough lit for safe access.
Fire-safety organizations also recommend keeping decorations away from open flames and making sure smoke alarms are working before Halloween activities begin.
Final Thoughts: Let Your Haunted House Tell a Story
The most memorable DIY Halloween decorations do more than fill space. They tell a story. Maybe your porch is an abandoned cemetery. Maybe your kitchen is a witch’s potion lab. Maybe your hallway is haunted by generations of dramatic ancestors who refused to leave after family dinner.
Start with a theme, use lighting to create mood, layer textures, and choose a few high-impact projects. You do not need a huge budget to make your home feel haunted. You only need imagination, a few supplies, and the confidence to hang fake cobwebs where normal people would display throw pillows.
When October arrives, let your house become the place people slow down to look at. Make it eerie. Make it funny. Make it creepy enough that the neighbors wonder what is behind the curtains, but friendly enough that trick-or-treaters still feel brave enough to ask for the good candy.
Personal Experiences and Lessons From DIY Haunted House Decorating
One of the funniest things about making DIY Halloween decorations is that every project looks easy until you are standing in the garage at 10:45 p.m. covered in fake spiderweb material, holding a glue gun, and trying to explain to your family why a foam tombstone needs “more emotional damage.” Halloween decorating has a special ability to turn perfectly reasonable adults into people who debate whether a plastic skeleton should be sitting, standing, gardening, or dramatically trapped in the mailbox.
The first lesson most people learn is that lighting changes everything. A decoration that looks ordinary in daylight can look fantastic after dark with the right spotlight. A cheap foam tombstone becomes more convincing when it is lit from the side. A paper bat display suddenly looks dramatic when shadows stretch across the wall. Even a bowl of plastic spiders can become creepy if it sits beside a flickering battery candle and an old-looking sign that says “Do Not Feed After Midnight.”
Another useful lesson is that you do not need to make everything from scratch. Some of the best haunted house displays begin with ordinary household items. Old glass jars become potion bottles. A spare sheet becomes a ghost. Cardboard boxes become crypt doors. A broken picture frame becomes haunted wall art. Branches from the yard become a creepy forest centerpiece. Halloween decorating rewards creativity much more than it rewards expensive shopping carts.
Many people discover that the best DIY decorations are the ones that invite a second look. A skeleton sitting in a chair is funny. A skeleton sitting in a chair wearing reading glasses and holding a newspaper titled “Still Waiting for Retirement” is unforgettable. A graveyard is spooky. A graveyard with tombstones labeled “R.I.P. Diet,” “Gone but Not Well Rested,” and “Here Lies the Last Slice of Pizza” gets people laughing while they take photos.
There is also a balancing act between spooky and overwhelming. Children may love friendly ghosts, pumpkin piles, goofy skeletons, and paper bats, while older guests may enjoy darker lighting, creepy sounds, and haunted portraits. The easiest solution is to keep the front yard playful and save the more dramatic details for indoor areas, hallways, or party spaces. That way, your home can appeal to tiny superheroes, teenage vampires, and adults who claim they are “only here for the candy” while taking twenty photos of your porch.
Weather is another important teacher. Wind can turn an outdoor Halloween display into a full-scale haunted disaster. Lightweight ghosts may fly into trees. Tombstones may lean like they have been hit by a supernatural tax audit. Fake cobwebs may migrate to the neighbor’s shrubs. Anchoring props, securing cords, and testing outdoor decorations before Halloween night can save a lot of frustration.
Finally, the best part of a DIY haunted house is not whether every decoration looks perfect. It is the reaction people have when they see it. Children stop at the sidewalk and point. Friends ask how you made the floating ghosts. Neighbors slow down while walking their dogs. Someone laughs at the ridiculous tombstone joke. Someone else gets startled by a hidden sound effect. Those reactions are what make the effort worthwhile.
A haunted house does not have to be flawless. It just needs personality. A crooked ghost, a slightly lopsided bat, or a skeleton that keeps falling over can become part of the charm. Halloween is one of the few holidays where messy, weird, dark, and delightfully over-the-top are not mistakes. They are the whole point.