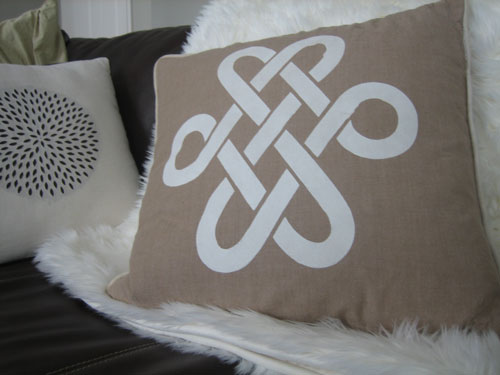
If you have ever looked at a plain pillow or a basic curtain panel and thought, “You’re nice, but you could use a little personality,” welcome to the club. Stenciling is one of the easiest ways to turn bland fabric into custom home decor without buying a sewing machine the size of a compact car or spending a fortune on designer textiles. With the right stencil, a little patience, and a paint application technique that does not resemble aggressively buttering toast, you can create a polished, high-end look on a budget.
This DIY project works beautifully on throw pillows, lumbar pillows, curtain panels, and even simple drop cloth drapes. It is especially good for anyone who wants the look of custom printed fabric without paying custom prices. Whether you are drawn to farmhouse stripes, botanical motifs, geometric repeats, or a simple monogram, learning how to stencil a pillow or curtain panel gives you creative control over color, scale, and style.
In this guide, you will learn exactly how to stencil fabric, what supplies to use, how to avoid paint bleed, and how to make your finished project look intentional instead of “I sneezed near a stencil and now we live with it.”
Why Stenciling Fabric Is Such a Smart DIY Move
A stenciled pillow or curtain panel gives you three big advantages. First, it is budget-friendly. A plain pillow cover or inexpensive curtain panel costs far less than boutique home decor. Second, it is customizable. You get to choose the stencil pattern, paint color, spacing, and overall vibe. Third, it is forgiving. Even if your first repeat is a little imperfect, fabric tends to soften minor flaws, which is wonderful news for beginners and perfectionists alike.
Stenciling also lets you coordinate your decor without going full matchy-matchy. You can repeat the same motif on a pair of curtain panels and then echo one color on a pillow, bench cushion, or lampshade. It is one of those rare home projects that looks expensive while secretly being powered by a foam pouncer and determination.
Best Fabrics for a Stenciled Pillow or Curtain Panel
Before you break out the paint, start with the right fabric. If your surface is too slick, too fuzzy, or too loosely woven, your stencil design may blur faster than your confidence.
Good fabric choices
Natural fabrics tend to be the easiest to stencil. Cotton, linen, canvas, cotton blends, and many close-weave home decor fabrics all take paint well. For pillows, cotton canvas, duck cloth, and linen blends are great options. For curtains, cotton curtain panels, drop cloth panels, or linen-look drapes work beautifully.
Fabrics to approach carefully
Very textured fabrics, slippery synthetics, velvet, and open-weave materials can make clean stencil edges harder to achieve. That does not mean they are impossible, but they are more likely to fight back.
Prewashed beats brand new
If your pillow cover or curtain panel is brand new, wash and dry it first. This removes sizing and residue from manufacturing. Skip the fabric softener and dryer sheets, because those can interfere with paint adhesion. Iron the fabric afterward so you start with a smooth, flat surface instead of trying to stencil over wrinkles that look like tiny mountain ranges.
Supplies You Will Need
Here is the basic toolkit for a successful stencil fabric project:
- Plain pillow cover or curtain panel
- Stencil of your choice
- Fabric paint or a paint suitable for fabric use
- Stencil brush, foam pouncer, or stencil dauber
- Painter’s tape or stencil adhesive
- Cardboard, plastic, or wax-covered board to place behind the fabric
- Paper plate or palette
- Paper towels or a lint-free rag
- Ruler or measuring tape
- Fabric-safe marking pencil or chalk
If you are working on a pillow cover, place cardboard inside the cover so paint does not seep onto the back. If you are stenciling curtain panels, slide a large piece of cardboard or a protected board underneath the section you are painting. In other words, always protect the layer beneath your design unless you enjoy surprise abstract art on the wrong side.
How To Stencil a Pillow or Curtain Panel Step by Step
1. Choose a design that matches the scale of the project
Scale matters more than people think. A tiny stencil repeated across a full-length curtain panel can take approximately one million years. A huge stencil on a small pillow can overwhelm the shape. For pillows, medium motifs or corner accents work well. For curtain panels, repeating patterns, stripes, vines, and trellis designs tend to look balanced and elegant.
2. Test the stencil and paint on a hidden area
Before painting the front-and-center section, do a quick test on an inside seam allowance, hem, or fabric scrap. This helps you confirm the paint color, opacity, and edge sharpness. It is a small step that can save you from a large dramatic sigh later.
3. Set up your fabric on a firm, flat surface
Spread the pillow cover or curtain panel flat. Smooth it carefully and tape the edges if needed so it does not shift while you work. Insert your protective barrier behind the area being painted. A stable surface is one of the main reasons some stencil projects look crisp and others look like they were completed on a trampoline.
4. Position and secure the stencil
Place the stencil where you want the design. Use painter’s tape, double-sided tape, or light stencil adhesive to keep it from sliding. On curtain panels, start near the top and work downward if you are doing a repeating design. This helps keep your spacing and alignment consistent.
5. Load your brush the right way
This is the golden rule of fabric stenciling: less paint is better. Dip your stencil brush or foam pouncer lightly into the paint, then blot off the excess onto a paper towel or plate. The applicator should look almost too dry. That “barely any paint” stage is exactly what helps prevent bleeding under the stencil edges.
6. Apply paint with an up-and-down pouncing motion
Do not scrub, swipe, or brush sideways across the stencil. Pounce straight up and down using light coats. Build color gradually instead of dumping on one thick layer. Thin, repeated applications give cleaner edges and a more even finish.
7. Lift the stencil carefully
When the area is covered, peel the stencil up slowly. If you are making a repeating pattern, let the paint set enough that you will not smear it during repositioning. Align the registration marks or match the pattern openings as you move to the next section.
8. Continue section by section
For pillows, you may only need one central motif, a corner design, or an all-over repeat on the front panel. For curtains, work in manageable sections and keep checking your vertical alignment. Measuring every few repeats is not overkill. It is how you avoid a pattern that drifts sideways halfway down the panel like it got bored.
9. Let the paint dry completely
Drying time depends on the product you use, so follow the label instructions. Resist the temptation to touch the design every three minutes “just to see.” That is how fingerprints become part of the pattern.
10. Cure or heat-set if required
Some fabric paints air-cure, while others recommend heat-setting with an iron once the paint is fully dry. Follow the paint manufacturer’s directions exactly. This step helps the design stay softer, more durable, and more wash-friendly over time.
Tips for a Crisp, Professional-Looking Finish
Use less paint than you think you need
This deserves repeating because it is the most common mistake. Too much paint equals bleed, mushy edges, and regret. A dry-brush or dry-pounce approach is your best friend.
Start simple
If this is your first stencil project, choose a bold geometric shape, leaf motif, stripe, or simple all-over pattern. Intricate medallions are gorgeous, but they can be a bit ambitious for your opening act.
Work with the room in mind
A stenciled lumbar pillow in a mudroom can handle a graphic motif. A set of living room curtain panels may look better with a softer repeating pattern. In a nursery, scattered stars or moons can feel whimsical. In a dining room, a trellis or block-print-inspired design brings structure without stiffness.
Match the paint finish to the look you want
Soft matte finishes usually look the most fabric-friendly and custom. Metallic accents can be pretty for holiday decor or glam spaces, but use them with restraint unless your pillow’s long-term career goal is to impersonate a disco ball.
Measure before repeating
When stenciling a curtain panel, it helps to mark faint guide lines using chalk or a disappearing fabric marker. That keeps rows straight and spacing even, especially on long panels where visual guesswork tends to get increasingly optimistic.
Common Mistakes to Avoid
Skipping the prep wash
If the fabric still has sizing or residue on it, paint may not bond well. Wash first, then dry and iron.
Using the wrong paint
Not every paint behaves nicely on fabric. Use fabric paint or a product specifically recommended for fabric surfaces. The wrong paint can feel stiff, crack, or peel.
Painting over wrinkles
Wrinkles can distort the stencil and create uneven contact. Ironing may not be the glamorous part of crafting, but it earns its paycheck here.
Not protecting the back layer
This is how a beautiful front design turns into an accidental two-sided experiment. Always insert cardboard or a barrier under the painted area.
Rushing the repeat pattern
Especially on curtains, misalignment becomes more noticeable with each repeated section. Slow down, check placement, and keep your pattern consistent.
Creative Design Ideas for Pillows and Curtain Panels
For pillows
- Single oversized botanical motif in the center
- Monogram in one corner for a custom gift
- Block-print-inspired repeat in a contrasting color
- Seasonal stencil like leaves, stars, or snowflakes
- Subtle tone-on-tone geometric pattern for a designer look
For curtains
- Vertical vine pattern along the outer edges
- All-over trellis repeat for a tailored effect
- Stenciled border near the hem for a quiet detail
- Organic stripes on drop cloth curtains
- Small repeated motif spaced evenly across white panels
If you are decorating on a budget, one of the smartest approaches is to buy simple neutral curtains and add a custom stencil pattern in a color already used elsewhere in the room. Suddenly the whole space feels coordinated, and your curtains stop looking like they came free with the apartment.
How To Care for a Stenciled Pillow or Curtain Panel
Once the paint is fully cured, care depends on the type of fabric paint you used. Many painted fabrics can be gently washed after an appropriate curing period. Turn painted pillow covers inside out when washing if possible, use a mild detergent, and avoid harsh treatment. Some stenciled curtains may be better spot-cleaned or washed on a gentle cycle. Always check the paint instructions first.
When ironing later, iron from the back side or use a pressing cloth if the manufacturer recommends it. Direct high heat on fresh paint is not the relationship you want.
Conclusion
Learning how to stencil a pillow or curtain panel is one of those wonderfully satisfying home DIY skills that delivers a lot of visual impact without requiring elite-level crafting credentials. The secret is not expensive equipment or magical talent. It is good prep, the right fabric, a securely placed stencil, and light paint application built up in layers.
Whether you are customizing a throw pillow for your sofa, upgrading budget drapes for the dining room, or adding a playful pattern to a bedroom curtain panel, stenciling gives you the freedom to create decor that actually looks like you chose it on purpose. Which, frankly, is the dream.
Start with a simple design, practice on a swatch, and trust the process. Once you finish one successful stenciled project, it becomes very hard to look at plain fabric without thinking, “I could absolutely improve you.”
Real-World Experiences and Lessons From Stenciling Pillows and Curtain Panels
One of the most relatable experiences with a stencil project is how dramatically your confidence changes between the first ten minutes and the last ten minutes. At the beginning, most people hover over the pillow cover or curtain panel like they are defusing a bomb. Is the stencil straight? Is the paint too wet? Is this pattern too large? Then, somewhere around the third repeat, the process starts to click. You realize the technique is less about artistic genius and more about rhythm: place, tape, pounce, lift, repeat. That is often the moment a beginner stops feeling nervous and starts feeling weirdly powerful.
Another common experience is discovering that simple designs usually look the most expensive. People often begin with grand dreams of intricate damask or tiny detailed florals, only to find that a clean stripe, a leaf motif, or a block-print-inspired pattern gives the room a more sophisticated result. There is a good lesson in that. Home decor does not always need more complexity. Sometimes it just needs one smart visual idea repeated consistently.
Many DIYers also learn that curtain panels teach patience in a way pillow covers do not. A pillow is a satisfying afternoon project. A curtain panel is a commitment. It is longer, larger, and much more likely to expose sloppy spacing. But it is also the project that tends to get the biggest reaction once it is hung. A basic white panel can go from forgettable to custom-looking with just one repeated stencil pattern. That transformation is a huge part of why people keep coming back to fabric stenciling. The before-and-after is genuinely impressive.
There is also the experience of troubleshooting in real time. Maybe the first pass looks too faint, so you adjust with a second light coat. Maybe one section bleeds a little, and you learn to offload more paint before the next repeat. Maybe you discover that your knees strongly object to stenciling curtain panels on the floor for an hour. All of that counts as progress. Fabric stenciling has a way of rewarding small adjustments quickly, which makes it much less intimidating than many other home decor crafts.
And then there is the oddly satisfying final stage: stepping back. This is when the little imperfections disappear and the overall effect takes over. Up close, you might notice one edge that is softer than the others. From across the room, all anyone sees is a custom pillow or a stylish set of curtains that looks far more expensive than it was. That is the real joy of this project. It combines creativity, practicality, and a bit of budget wizardry. You end up with decor that feels personal, useful, and honestly a little brag-worthy. Not in an obnoxious way, of course. More in a casual, “Oh these? I stenciled them myself,” kind of way.