There is a special kind of ambition that begins with one blinking LED and ends with a room full of wires, power supplies, software windows, and someone quietly asking, “Is this supposed to smell warm?” The story behind An Even Larger Array Of Many LEDs And No Ping-Pong Balls belongs firmly in that glorious maker tradition. It is not just about adding more lights. It is about learning why a hobby project that looks magical on a desk has to grow up fast when it is dragged into clubs, events, installations, and real-world environments where “mostly works” is not exactly a professional specification.
The project follows the evolution of a large RGB LED panel built by George, a young maker who had already experimented with smaller arrays and ping-pong-ball diffusers. Earlier builds used the classic DIY trick: place a glowing RGB LED behind a translucent table-tennis ball and suddenly a harsh point of light becomes a soft, charming pixel. It is cheap, clever, and visually delightful. But when the build scaled into a larger, more serious display, those plastic balls had to go. Not because they were ugly. They were not. They looked like a rainbow had discovered bubble wrap. The problem was durability, transport, wiring reliability, and fire safety.
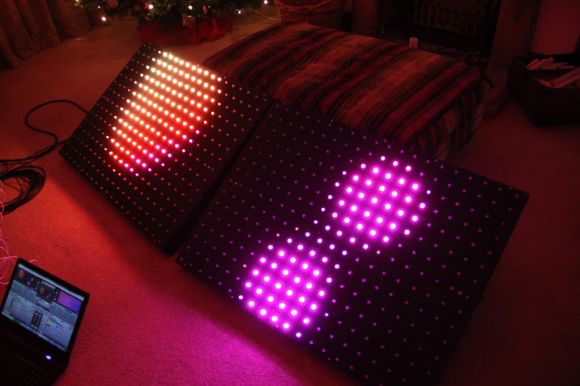
The result was the MX3-style direction: a tougher, cleaner, more professional LED array using two 20-by-15 panels for a total of 600 LEDs. Instead of delicate point-to-point wiring and ping-pong-ball diffusion, the newer design leaned into stronger construction, WS2812-style addressable LED strings, Raspberry Pi-based control, Art-Net communication, metal framing, and fire-retardant front panels. In short, the project matured from “look what I made” into “this might survive a road case, a dark venue, and a human with a clipboard.”
From Cute Ping-Pong Pixels to Serious LED Panels
Ping-pong-ball LED displays have a long-standing appeal in the maker world because they solve a visual problem with almost ridiculous elegance. Individual LEDs can be painfully bright and uneven. They often produce a tiny dot of intense color rather than a smooth pixel. A white plastic sphere acts as a diffuser, spreading light across a wider surface and blending red, green, and blue more gently. For small decorative displays, clocks, signs, or playful installations, the effect is excellent.
George’s earlier displays followed that path. The project began with an 8-by-8 RGB LED grid, then grew into a 32-by-16 array with 512 individually addressable pixels. That larger ping-pong-ball version was already impressive: modular, colorful, and very much the sort of project that makes other hobbyists stare at their own half-finished breadboards with shame. However, scale has a funny way of turning clever shortcuts into engineering debts. A diffuser ball that is charming on a wall panel can become a headache when hundreds of them must be mounted, packed, transported, repaired, and kept safe under stage conditions.
The move to a 600-LED array was not simply about making the display bigger. In pure pixel count, 600 LEDs is only a modest increase from the previous 512-pixel build. The real upgrade was in the design philosophy. The new array was built for reliability. It had to be mounted more securely, controlled more cleanly, and maintained without the old ritual of poking wires in the dark while hoping the crowd thinks the flicker is part of the show.
Why the Ping-Pong Balls Had to Retire
Let us pause for a respectful farewell to the ping-pong balls. They did their job. They diffused light beautifully. They gave the display a soft, organic pixel shape. They made the project instantly understandable to anyone who has ever held a table-tennis ball and wondered, “Could I put an LED in this?” But in the larger professional build, they introduced several practical problems.
Fire Safety Matters
The biggest issue was safety. LED projects are often described as cool-running compared with old incandescent lighting, but large arrays still involve current, wiring, power distribution, heat, and materials. In event settings, materials must be treated seriously. A grid of plastic balls may look playful, but if the installation is mounted near people, stage lighting, power gear, or venue infrastructure, flammability becomes more than a footnote. The newer design used fire-retardant treatment on the front panels, which is exactly the sort of boring detail that separates an art piece from an insurance conversation.
Mechanical Strength Becomes Critical
Small displays can be handled gently. Big displays are bullied by reality. They get lifted, tilted, packed, bumped, leaned against walls, and occasionally handled by someone who believes “fragile” is a decorative word. Ping-pong balls are not made for rugged touring. A professional panel needs a frame that can take stress, support rigging, and stay square. The newer build used a more serious structure, including a steel tube backbone and an aluminum shell. That kind of construction gives the panel hardpoints and practical mounting options.
Wiring Must Stop Being a Treasure Hunt
Point-to-point LED wiring is romantic only in photographs taken before anything breaks. Once hundreds of discrete connections are involved, every joint becomes a possible gremlin. The earlier build suffered from shorts and reliability issues, especially when moved and installed repeatedly. Switching to addressable LED strings simplified the electrical layout and made the project easier to manage. Fewer fragile connections mean fewer late-night troubleshooting sessions, and fewer late-night troubleshooting sessions mean a happier maker with fewer dramatic sighs.
The Electronics Behind the Larger LED Array
The heart of this larger array is the use of individually addressable RGB LEDs. In modern maker language, this usually means pixels similar to WS2812, WS2811, WS2801, SK6812, or related families. Each pixel can receive color data and pass remaining data down the chain. Instead of wiring every red, green, and blue channel separately, the controller sends a timed data signal that tells each LED what color to display. This is the magic that lets one strip become a rainbow, a scrolling sign, an animation surface, or a low-resolution video wall.
Addressable LEDs are popular because they compress a lot of complexity into each pixel. A tiny package can include red, green, and blue LED elements plus a driver circuit. For builders, that means fewer external driver chips and easier control. For large arrays, it also means planning carefully around data timing, refresh rate, voltage drop, and current draw. The LEDs may be small, but a few hundred of them can behave like a very pretty electrical appetite.
In George’s updated design, Raspberry Pi boards were mounted on the panels to control the LED strings. A Raspberry Pi provides enough computing power to handle networking, animation control, and communication with lighting software. That is useful because once a panel enters the world of performances or installations, it is no longer just blinking for fun. It may need to respond to lighting cues, synchronize with other devices, or accept data from professional lighting software.
Art-Net: When Blinky Lights Join the Stage Crew
One of the most important upgrades in the project was communication via Art-Net. Art-Net is widely used in lighting control because it carries DMX-style lighting data over Ethernet. Traditional DMX512 has long been a standard in stage lighting, but Ethernet-based control makes larger and more flexible installations easier to manage. For an LED array, that means the panel can fit into the same ecosystem as stage fixtures, lighting consoles, and visual-control software.
This matters because a large LED wall is not only a collection of lights. It is also a node in a larger show-control system. If the array can receive Art-Net, it can be driven by front-end lighting software, coordinated with other visual elements, and used in professional environments without inventing a custom control universe from scratch. Custom code is fun until showtime. Then standards start looking very attractive, like a toolbox that also brings coffee.
Power: The Part Nobody Should Ignore
Large LED arrays are beautiful, but they are not powered by optimism. Each RGB LED can draw meaningful current, especially at high brightness when red, green, and blue channels are all active. Multiply that by 600 pixels and the power plan becomes central to the build. Even if the display rarely runs full-white at maximum brightness, the wiring and power supplies must be selected with safe worst-case behavior in mind.
Good LED design includes power injection, proper wire gauge, shared grounds, fusing where appropriate, and careful attention to voltage drop. When power travels through long runs of LED strip or thin wire, voltage can sag. The visible symptom is often color shift: pixels far from the power supply may look dimmer or warmer because they are not receiving the same voltage as the first pixels. The less visible symptom is stress on connectors and wiring. Nobody wants a display that doubles as a toaster with opinions.
Builders often reduce risk by limiting brightness in software, distributing power across multiple points, and testing the array in stages. A 600-LED panel should not be treated like one big decorative string. It is a system. Power distribution is the skeleton, data control is the nervous system, and the LEDs are the glamorous skin that gets all the Instagram attention.
Diffusion Without Ping-Pong Balls
Removing ping-pong balls does not mean abandoning diffusion. It means choosing a diffuser that better fits the mechanical and safety requirements of a larger display. Acrylic panels, frosted plastics, translucent sheets, milky polycarbonate, and treated front panels can all soften LED output. The goal is to reduce harsh glare, blend colors, and create pixels that look intentional rather than like 600 tiny flashlights shouting at the audience.
Diffusion is a balancing act. Place the diffuser too close to the LEDs and each pixel may remain visibly sharp. Move it farther away and colors blend more smoothly, but the display may lose brightness and contrast. Use material that is too opaque and the panel looks muddy. Use material that is too clear and the viewer sees every LED package. Good diffusion is like good seasoning: invisible when done well, painfully obvious when forgotten.
For larger arrays, the shape of the pixel also changes the personality of the display. Ping-pong balls create round, glowing orbs. A flat diffuser creates a cleaner sign-like surface. Exposed LEDs feel raw and high-energy. Deep cells or baffles can create a crisp grid. There is no single correct answer, only the right trade-off for the venue, viewing distance, brightness, and desired aesthetic.
Why 600 LEDs Can Feel Bigger Than the Number Suggests
In a world of 4K screens and phone displays with microscopic pixels, 600 LEDs may sound tiny. But LED arrays are not trying to compete with televisions on resolution. They win through scale, brightness, color, and presence. A 20-by-15 panel does not show fine detail, but from across a room it can display patterns, motion, gradients, symbols, and ambient visuals with enormous impact. Two panels working together can become a stage backdrop, a DJ booth feature, an interactive installation, or a kinetic light sculpture.
The secret is viewing distance. Low-resolution LED walls look best when the viewer is far enough away for the pixels to merge into a coherent image. Up close, the display is a grid. Farther back, it becomes motion and atmosphere. That is why stage LED walls can use relatively large pixel spacing compared with consumer screens. The audience is not inspecting spreadsheets on them. They are feeling the room change color.
This is also why DIY LED arrays remain exciting. They are not simply “bad TVs.” They are a different medium. They can be architectural, playful, reactive, musical, sculptural, and wonderfully physical. You do not look at them the same way you look at a laptop screen. You experience them as light in space.
Lessons Makers Can Learn From This Build
Design for the Second Version
The first version of any project teaches you what you actually built. The second version teaches you what the project wants to become. George’s array is a perfect example. The early ping-pong-ball displays proved the visual concept. The larger professional build solved the problems discovered through use. That is how real engineering happens: not in a straight line, but in loops of building, testing, breaking, muttering, rebuilding, and eventually pretending it was planned all along.
Think About Transport Early
If a display is ever going to leave the bench, transport must be part of the design. Can it fit through a doorway? Can one person lift it? Are connectors protected? Can cables be unplugged quickly? Are the mounting points strong enough? Can damaged sections be repaired without dismantling the whole panel? These questions are less glamorous than animation effects, but they decide whether a project becomes useful or remains a delicate shrine in the corner of a workshop.
Use Standards Where They Help
Custom protocols are tempting, especially for programmers. But lighting standards such as DMX and Art-Net exist because many devices need to communicate reliably in the same environment. By supporting Art-Net, an LED panel becomes easier to integrate with existing software and show-control workflows. That opens the door to more serious uses, from live performances to permanent installations.
Safety Is a Feature
Fire-retardant materials, solid frames, strain relief, proper power distribution, and clean wiring are not boring extras. They are features. A project that is safe, repeatable, and easy to inspect is more professional than one with twice the pixel count and half the planning. Brightness impresses people for a moment. Reliability impresses them after the third successful show.
Specific Examples of Better LED Array Design Choices
A hobbyist trying to build a similar large LED array today has more options than ever. Addressable LED strips can be purchased in many densities, including 30, 60, 96, or 144 LEDs per meter. Lower-density strips reduce power consumption and make larger pixels easier. Higher-density strips improve resolution but increase power, heat, data timing concerns, and cost. For a wall-sized decorative display, lower density often makes more sense than chasing resolution like a caffeinated smartphone engineer.
Controllers have also improved. Raspberry Pi boards, ESP32 microcontrollers, Teensy boards, and dedicated LED controllers can all drive impressive installations. Libraries such as FastLED and NeoPixel-style ecosystems make animation development easier, while high-performance approaches like parallel output help large arrays refresh faster. For serious work, builders often split the display into multiple data lines instead of chaining everything into one long strip. This reduces update time and can make troubleshooting simpler.
Mechanical design is equally important. A wooden frame may work for a stationary home project, while aluminum extrusion or welded metal may be better for portable installations. Foam board is lightweight and easy to cut, but it may not be appropriate for every environment. Acrylic diffusion looks clean, but it must be cut, mounted, and protected carefully. Even small details such as cable labels and connector orientation can save hours when something fails five minutes before an event.
Experiences Related to Building an Even Larger LED Array With No Ping-Pong Balls
Working on a large LED array teaches patience in a way few projects can. At first, the idea seems simple: arrange LEDs in a grid, connect a controller, upload code, and bask in colorful glory. Then reality arrives wearing safety glasses. The first experience many builders have is discovering that LEDs are obedient but unforgiving. If the data line is wrong, nothing happens. If the ground is missing, strange things happen. If power is weak, the first few pixels look fine while the far end develops the complexion of a tired flashlight.
One of the most useful experiences is testing in small sections before assembling the full display. A 600-LED build should not debut as a complete mystery. Testing a single strip, then a row, then a panel helps catch bad solder joints, reversed connectors, weak power feeds, and code mistakes early. It is much easier to fix one row on a table than to diagnose a dark pixel after the panel is mounted vertically and your only tool is a flashlight held between your teeth.
Another lesson is that physical layout affects software. In a perfect world, LED number zero starts in the top-left corner and every row runs left to right. In the real world, strips often snake back and forth because that wiring is more efficient. This creates a mapping problem: the software must translate x-y coordinates into the actual order of LEDs. Good mapping code can make a messy wiring layout behave like a clean matrix. Bad mapping code can make a smiley face look like it was assembled by a haunted spreadsheet.
Diffusion experiments are also surprisingly addictive. A bare LED grid looks sharp and energetic, but it can be hard on the eyes. Add frosted acrylic and the panel becomes smoother. Move the diffuser farther away and the pixels blend more. Add internal dividers and the image becomes crisper. Change the front material and the color temperature shifts. Builders often start with one plan and end up holding random plastic samples in front of LEDs like jewelers evaluating gemstones, except the gemstone is a sheet of milky acrylic and the jeweler is covered in solder smoke.
Large arrays also teach respect for cable management. Loose wires look harmless until the panel is moved. Then they snag, flex, short, or hide faults in places only a very patient person can reach. Strain relief, cable ties, labels, and service loops may not make the display brighter, but they make future repairs possible. A well-labeled panel is a love letter to your future self, who will otherwise be kneeling behind the display asking why every red pixel in column fourteen has chosen rebellion.
Finally, the best experience is seeing the array run in a real space. On a bench, an LED panel is a technical object. In a dark room, it becomes atmosphere. Slow gradients can make a wall feel alive. Audio-reactive patterns can turn music into architecture. Simple scrolling text can become signage with personality. A large LED array with no ping-pong balls may look more professional than its round-pixel ancestor, but it still carries the same maker spirit: take light, arrange it carefully, teach it to move, and try not to trip over the power cable while admiring your own work.
Conclusion
An Even Larger Array Of Many LEDs And No Ping-Pong Balls is more than a quirky project title. It is a snapshot of how DIY electronics mature. The earlier ping-pong-ball displays proved that cheap diffusion and addressable RGB pixels could create something charming and memorable. The larger array proved that a serious LED display needs stronger decisions: safer materials, better framing, cleaner wiring, smarter control, and standards-based communication.
The project is a reminder that scaling up is not only a matter of buying more LEDs. Bigger panels expose every weakness. A tiny short becomes a hunt. A flimsy frame becomes a liability. A cute diffuser becomes a safety concern. But when those lessons are handled well, the reward is enormous: a display that is bright, expressive, durable, and ready for real venues. Ping-pong balls may have made the early pixels lovable, but the no-ping-pong version shows what happens when a maker project puts on steel-toed boots and joins the professional lighting world.
Note: This article is written as original, publication-ready content based on real maker-project history, addressable LED practices, diffusion methods, and stage-lighting control concepts.