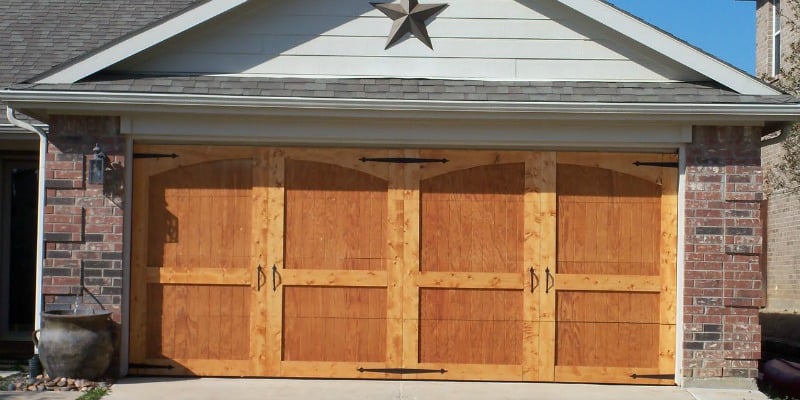
A garage door can take up a surprisingly large percentage of your home’s front exterior, which means a tired, faded, or builder-basic door can quietly drag down the entire view from the street. The good news? You do not necessarily need a brand-new garage dooror a contractor-sized budgetto make a noticeable improvement.
Many DIY garage door updates can be completed over a weekend using paint, decorative hardware, weather seals, insulation, trim, and a little patience. Some changes are purely cosmetic, while others can improve comfort, weather resistance, lighting, and everyday convenience.
There is one important boundary, however: garage doors are extremely heavy, and their springs and lift cables operate under significant tension. Painting and decorating are friendly DIY territory. Adjusting torsion springs or repairing lifting cables is very much a “call someone who does this for a living” situation.
With that safety rule established, here are eight garage door makeover ideas that can make your home’s biggest moving wall considerably better looking.
1. Give the Garage Door a Fresh Coat of Paint
If your garage door is structurally sound but looks like it remembers the invention of dial-up internet, paint is usually the most dramatic low-cost upgrade.
A fresh color can help a garage door blend into the house instead of dominating it. Neutral shades such as charcoal, warm gray, taupe, cream, muted green, and off-white are versatile choices. Another strategy is to choose a color close to the siding or brick so the garage visually recedes and the front entrance becomes the focal point.
How to Paint a Garage Door Properly
Preparation matters more than the exciting part where you open the paint can. Wash away dirt and chalky residue, remove loose paint, lightly sand rough edges, and deal with rust on metal doors before applying new coatings. Protect windows, trim, and hardware with painter’s tape.
For metal doors with exposed rust, remove loose corrosion and use a compatible rust-inhibiting primer. Paint recessed areas with a brush before rolling the broader sections. Exterior-grade paint designed for the door’s material is the sensible choice. Sherwin-Williams similarly recommends cleaning, sanding rough areas, treating rust, masking surrounding surfaces, and working panel by panel.
Do not paint flexible weather seals, tracks, rollers, or other operating components unless the door manufacturer specifically permits it. Your garage needs a makeover, not glued-together moving parts.
2. Add Decorative Carriage-House Hardware
Decorative hinges and handles can transform a plain sectional door into something resembling a carriage-house door for considerably less money than replacing it.
Black hardware works especially well on white, cream, beige, wood-look, and muted-color doors. Typical kits include decorative hinge straps and pull-handle accents. Garage-door manufacturers offer similar exterior hardware specifically to create this traditional look.
Try Magnetic Hardware on Steel Doors
If you have a compatible steel door, magnetic decorative hardware can be especially DIY-friendly. There are no holes to drill, and you can reposition the pieces until everything looks balanced.
Before ordering, confirm that magnets actually stick to your door. Some doors may contain aluminum, fiberglass, composite surfaces, or enough nonmagnetic material to ruin that brilliant five-minute installation plan.
Also remember that decorative handles are usually decorative. Do not grab a faux handle and enthusiastically attempt to lift an automatic sectional door unless the product is specifically designed to function that way.
3. Create the Look of Garage Door Windows
Windows can break up a large blank surface and make an ordinary garage door feel more architectural. Manufacturers offer garage doors with rectangular, arched, square, carriage-style, and decorative window patterns, with various glazing options.
But cutting holes into an existing garage door is not necessarily a beginner DIY project. The weight and structure of the sections matter, and modifications can affect door balance or warranties.
Use Faux Windows Instead
For a safer cosmetic approach, create the illusion of windows using removable exterior-rated vinyl, magnetic panels on compatible steel doors, or another product specifically designed for garage-door surfaces.
Dark rectangular shapes positioned across the upper row of panels can look surprisingly convincing from the street. Measure carefully and keep spacing identical. One rectangle sitting half an inch lower than its neighbors has an impressive ability to become the only thing you notice for the next seven years.
If your existing door was manufactured for replaceable decorative window inserts, changing those inserts can also provide an updated appearance without modifying the door’s basic construction.
4. Add a Wood-Look Finish Without Buying a Wood Door
Real wood garage doors can look fantastic, but they generally demand more maintenance than steel. If you like that warmth but already have a serviceable door, consider a lightweight decorative finish instead.
Options include professionally manufactured garage-door wraps, compatible exterior vinyl films, faux wood painting techniques, or lightweight decorative overlays engineered for garage doors. Better Homes & Gardens notes that garage door wraps are available in a variety of finishes and can refresh faded or dated surfaces without repainting.
Weight Is the Detail You Cannot Ignore
Do not casually screw thick lumber across your existing panels because Pinterest whispered, “farmhouse.”
A garage door’s springs are selected to counterbalance a particular door weight. Adding substantial material changes that weight and can interfere with proper operation. Stick to lightweight systems specifically suitable for garage doors, and check the manufacturer’s instructions before permanently attaching anything.
If an update noticeably changes how easily the door opens, stop using it and have the balance checked professionally.
5. Replace Worn Weatherstripping and the Bottom Seal
This upgrade is not glamorous enough to receive compliments from neighbors, but it may be one of the most practical.
Inspect the flexible seal along the bottom of the garage door and the weatherstripping around the sides and top. If the material is cracked, brittle, missing, or no longer contacts the floor or door properly, replacement can help reduce gaps where drafts, dust, rain, and insects enter.
Weatherstripping is designed to reduce unwanted air leakage around openings, and garage-compatible replacement products are widely available in rubber, vinyl, and similar weather-resistant materials.
Check Compatibility Before Buying
Bottom seals are not universal. Different garage doors use different retainers and seal profiles, so inspect the existing seal before ordering a replacement.
Measure the width of the door, identify the retainer style, and buy enough material to span the opening with a little extra for trimming. Clean the track or retainer before sliding the new seal into place.
If your “weatherstripping problem” is actually caused by a crooked door, damaged track, or serious alignment problem, replacing rubber will not magically cure it.
6. Insulate an Uninsulated Garage Door
If your garage becomes an oven in summer and a walk-in refrigerator in winter, an insulation upgrade may make the space more comfortableespecially when the garage is attached to the house or used as a workshop.
Garage-door insulation kits commonly use rigid foam or reflective systems cut to fit within sectional door panels. Factory-insulated doors typically offer more sophisticated construction, sometimes sandwiching insulation between layers of steel. Higher R-values generally indicate greater resistance to heat flow.
Choose a Kit Designed for Your Door
Measure individual panels instead of assuming every rectangle is exactly the same size. Cut insulation carefully so it fits securely without interfering with hinges, rollers, tracks, or cables.
Also consider added weight. An insulation kit intended for residential garage doors is preferable to improvising with heavy building materials. After installation, operate the door and watch for unusual hesitation, binding, excessive opener strain, or balance issues.
Insulation works best as part of a complete approach. A nicely insulated door with an inch-wide gap underneath is basically wearing a winter coat with no pants.
7. Refresh the Trim Around the Garage Door
Sometimes the door is not the real problem. Faded trim, cracked exterior caulk, peeling paint, or damaged perimeter molding can make an otherwise decent garage door look much older.
Cleaning and repainting the trim provides a sharper frame around the door and can visually connect the garage with other exterior elements such as window trim, shutters, columns, and the front entry.
Use Contrast Strategically
For a subtle appearance, keep the garage door and surrounding trim close to the home’s siding color. For stronger architectural definition, use contrasting trim while keeping the door itself quieter.
Exterior design professionals often recommend considering the entire facade rather than choosing a garage-door color in isolation. Sampling colors and viewing them from the street can prevent combinations that looked fantastic on a two-inch paint chip but strangely aggressive across sixteen feet of garage door.
While you are working around the opening, inspect deteriorated caulk or exterior trim and repair moisture-related damage instead of simply painting over it.
8. Modernize the Opener, Lighting, and Safety Features
A garage-door update does not have to stop at appearance. If your opener is compatible with smart controls, adding connected access can make daily use more convenient. Depending on the system, modern controls can provide door-status information, remote operation, schedules, or alerts.
Lighting deserves attention too. A brighter opener light or well-placed exterior fixtures can improve visibility around the garage at night while making the newly updated facade look intentional instead of disappearing into darkness.
Test the Safety-Reversal System
Any weekend spent improving a garage door is also an excellent excuse to check its safety equipment.
LiftMaster’s homeowner safety guidance recommends checking that photo-eye sensors are present near the bottom of the opening, verifying that blocking the beam prevents closing, and confirming that the opener reverses when the door encounters an appropriate object in its path. Follow the instructions for your specific opener when conducting any safety test.
If sensors, wiring, or reversal systems are not operating properly, resolve the problem before treating the garage door as normal.
How to Combine the Updates Without Overdoing It
The best garage door makeover usually combines two or three improvements rather than throwing every possible accessory at the door.
For a farmhouse-inspired home, for example, you might choose warm white paint, black magnetic carriage hardware, and faux upper windows. A contemporary home might look better with charcoal paint, minimal trim, and upgraded exterior lighting. A traditional brick home may need nothing more than a coordinating neutral paint color and crisp new perimeter seals.
Garage doors already occupy a large visual area. They rarely need additional assistance screaming, “LOOK AT ME.”
Before beginning, take a straight-on photo from the street and experiment digitally with colors and details. Several garage-door and paint manufacturers offer visualization tools that help homeowners preview design changes before committing. Garage doors can strongly influence the overall impression of a home’s exterior, which explains why manufacturers increasingly offer extensive window, hardware, color, and panel customization.
DIY Garage Door Updates You Should Leave to a Professional
There is a clear difference between improving a garage door and rebuilding its lifting system.
Homeowners should be extremely cautious around torsion springs, extension springs, lift cables, cable drums, and hardware connected to spring tension. These parts store or transfer substantial mechanical force. Damaged cables can also leave a garage door dangerously heavy or unstable.
Call a qualified garage-door technician if you notice a broken spring, frayed cable, crooked movement, a door that suddenly feels unusually heavy, serious track damage, or a door that will not stay balanced.
Painting a door yourself can save money. Attempting to outsmart a torsion spring because you once assembled an IKEA dresser is a considerably different category of confidence.
Experience Notes: What a Weekend Garage Door Makeover Usually Teaches You
The most useful lessons from a DIY garage door update often appear after the project begins. What looked like “paint the door Saturday morning” frequently turns into a crash course in preparation, patience, measurements, and the mysterious ability of outdoor dirt to hide until approximately four seconds after you open a paint can.
Preparation Takes Longer Than the Fun Part
A typical beginner expects painting to consume most of the day. In practice, washing, drying, scraping, sanding, masking windows, protecting the driveway, and dealing with small rust spots can take nearly as much effort as applying the paint.
That preparation is worth it. A carefully prepared average paint job generally looks better than an expensive coating brushed over dirt and peeling material. The same lesson applies to wraps and decorative accents: clean surfaces and careful measuring make inexpensive materials look considerably more convincing.
Street-Level Perspective Changes Everything
Standing three feet from a garage door encourages obsessing over tiny imperfections. From the sidewalk, those microscopic brush marks vanish, while proportions suddenly become far more important.
This is especially noticeable with faux windows and decorative hinges. Place the pieces temporarily, walk to the curb, and look at the entire house before committing. You may discover that the handles need to move outward, the faux windows should be slightly larger, or the dramatic black paint you loved in the store has turned your garage into the architectural equivalent of a giant television.
Small Improvements Often Work Better Together
A newly painted door can still look unfinished beside faded trim. Beautiful decorative hardware cannot disguise a shredded bottom seal. New insulation will not eliminate drafts if daylight is visible around the perimeter.
The strongest results therefore tend to come from combining one visual improvement with one maintenance improvement. Paint plus weatherstripping is a good example. Decorative hardware plus fresh trim is another. Insulation plus new perimeter seals can improve the functional side while you are already spending a weekend working on the door.
Measure First, Then Measure Again
Garage doors are wonderfully effective at exposing sloppy measurements because they contain repeated horizontal and vertical lines. Decorative hardware installed slightly off-center can look much more crooked than the same mistake would on an irregular surface.
A tape measure, pencil, level, painter’s tape, and temporary placement are your friends. Mark centerlines and compare distances from panel edges instead of trusting your eyeballs. Human vision is excellent at recognizing faces and remarkably optimistic about whether two handles are actually level.
You Learn When DIY Should Stop
Perhaps the most valuable experience is learning to recognize the line between a cosmetic project and a mechanical repair.
While cleaning a door, you might notice a fraying cable. While replacing a seal, you may realize the door closes unevenly. After adding insulation, you could discover that the door no longer balances normally. Those observations are useful, but they do not automatically become invitations to dismantle the lifting system.
A successful DIY project is not measured by completing every repair personally. Sometimes the smartest tool in the garage is your phoneand the smartest move is using it to call a qualified technician.
Final Thoughts
The best DIY garage door updates do not require transforming the door beyond recognition. A new color, thoughtful hardware, faux windows, weatherstripping, insulation, refreshed trim, or improved controls can make an existing door feel much newer while addressing practical problems at the same time.
Start with the condition of the door rather than the latest design trend. If it operates safely and the panels are structurally sound, cosmetic improvements can deliver a substantial visual change without replacement. If major mechanical problems exist, repair those first.
Most importantly, know which projects belong in DIY territory. Paint brushes, vinyl, weather seals, insulation panels, and decorative magnets are friendly company. High-tension springs and lifting cables are not.
Note: Garage-door designs vary by manufacturer. Always follow the installation and maintenance instructions for your specific door and opener, and use a qualified technician for spring, cable, balance, or other high-tension repairs.