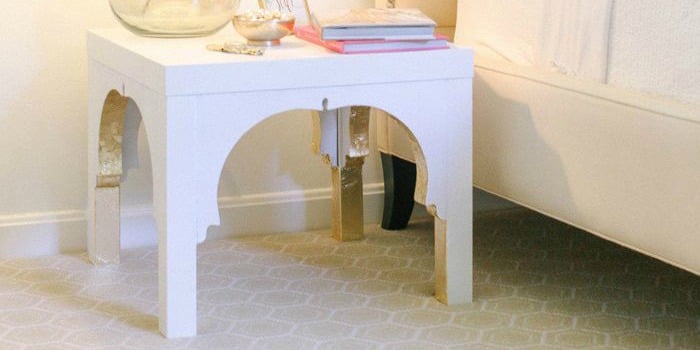
The IKEA LACK table is the plain white T-shirt of furniture: affordable, familiar, and almost suspiciously eager to be customized. Straight from the box, it is a practical little square with clean lines and no strong opinions. Give it paint, tile, cane, trim, or a convincing roll of faux-marble vinyl, however, and it can become the most complimented piece in the room.
Its uncomplicated shape makes the LACK side table particularly friendly to beginner DIY projects. You can change only the tabletop, wrap the entire structure, add storage, combine multiple tables, or disguise it so thoroughly that even devoted IKEA shoppers may not recognize it.
There is one important detail to understand before introducing your table to a power drill. A LACK tabletop is not a thick slab of solid wood. Its lightweight construction includes a framed board with a honeycomb-style paper filling. That makes the table easy to move, but it also means you should plan carefully when attaching heavy materials, screws, casters, or structural additions. Treat it like a clever lightweight base rather than a miniature workbench.
Before You Start Your IKEA LACK Table Makeover
Successful IKEA LACK table hacks usually begin with unglamorous preparation. Yes, cleaning is boring. So is primer. Unfortunately, peeling paint is even more boring, especially when it begins peeling three days after you proudly announce that you have “basically become a furniture designer.”
Prepare the Surface Correctly
Clean the table with a mild degreasing solution, wipe away any residue, and allow it to dry completely. For painted projects, lightly scuff the smooth finish without sanding through it. Apply a bonding primer suitable for laminate or slick manufactured surfaces, followed by thin coats of paint. Respect the drying and curing times printed on each product.
Choose Materials That Match the Table
Lightweight materials such as peel-and-stick wallpaper, thin wood veneer, flexible cane webbing, decorative molding, and acrylic mirror panels are easier for the table to support. Real stone, thick concrete, or a large quantity of ceramic tile can add substantial weight. For heavier designs, reinforce the structure or use a thin decorative product that creates the same look.
Remember the Final Function
A bedside table, children’s activity station, plant stand, and coffee table face very different levels of abuse. A decorative bedroom piece may need only a carefully painted finish. A snack table requires moisture resistance, while a play table should have rounded edges, secure attachments, and an easy-to-clean surface.
29 Stylish IKEA LACK Table Hacks
1. Paint It in One Dramatic Color
Start with the simplest transformation: paint the tabletop and legs in one saturated shade. Deep olive, oxblood, navy, warm terracotta, and glossy black can make the familiar silhouette look deliberate rather than basic. A monochromatic finish works especially well in a small bedroom where too many materials would create visual clutter.
2. Create a Two-Tone Color-Block Design
Paint the tabletop one color and the legs another. For a playful modern look, combine butter yellow with cream, rust with dusty pink, or cobalt blue with bright white. Painter’s tape can also divide each leg into contrasting sections. Measure every taped line, because “casually uneven” usually looks more like “the coffee kicked in halfway through.”
3. Wrap the Top in Faux Marble
Marble-pattern contact paper is one of the fastest IKEA LACK table makeover options. Clean the top thoroughly, position the pattern before removing the backing, and smooth the vinyl gradually with a plastic scraper. Fold or trim the corners neatly. Use coasters afterward, since decorative adhesive films vary in their resistance to moisture and heat.
4. Build a Marble-Look Cube Table
Take the faux-marble idea further by attaching lightweight MDF or plywood panels between the legs. Wrap the top and panels in matching marble-effect vinyl to create a solid cube silhouette. The finished piece resembles a sculptural stone table without requiring the floor strengthor personal trainerneeded for the real thing.
5. Try a Rich Burlwood Finish
Burlwood-pattern adhesive film gives the LACK table the swirling, luxurious appearance of rare wood. Wrap the tabletop alone for a restrained update or cover the legs as well for a continuous block of pattern. Warm burl tones pair beautifully with cream upholstery, black accents, brass lighting, and dark green walls.
6. Add Grasscloth-Style Wallpaper
Textured peel-and-stick wallpaper can soften the table’s crisp modern shape. A beige, gray, or muted blue grasscloth pattern works in coastal, transitional, and relaxed contemporary rooms. Smooth the material carefully around the corners and keep seams on the least visible sides. A clear acrylic top can protect the paper from spills.
7. Create a Fluted Side Table
Attach half-round molding, narrow wood dowels, or lightweight pole-wrap panels around the exterior sides. Paint everything one color so the added texture appears architectural rather than crafty. A fluted LACK table looks especially polished in warm white, charcoal, sage green, or mushroom brown.
8. Apply a Greek Key Overlay
Decorative overlays can give the table a more traditional or Hollywood Regency personality. Attach a lightweight Greek key pattern around the apron or outer edges, then paint the overlay and table in the same finish. Add a custom-cut glass or acrylic top to protect the surface and emphasize the furniture-like appearance.
9. Add Cane or Rattan Panels
Frame sections of cane webbing with thin trim and attach them between the table legs. Natural cane warms up a white or black frame and works nicely in bohemian, coastal, and modern organic interiors. For a cleaner finish, stretch the cane evenly before fastening it and hide the raw edges behind molding.
10. Install a Mosaic Tile Top
Small mosaic tiles can turn the tabletop into a colorful focal point. Use lightweight tile where possible and check that the finished top will not become excessively heavy. A simple checkerboard, floral motif, or Mediterranean-inspired border is easier to plan than an improvised pattern that mysteriously becomes a lopsided octopus.
11. Use Peel-and-Stick Tile
For the tiled look without mortar, grout, and an afternoon of questioning your life choices, use high-quality peel-and-stick tile. Measure the tabletop, dry-fit the pattern, and trim the edges with a sharp utility knife. Seal exposed seams if the manufacturer recommends it, particularly when the table will hold drinks.
12. Give It a Concrete Finish
A thin cement-based skim coat can create a convincing concrete appearance. Apply multiple light layers rather than one heavy layer, sand between coats if required, and seal the finished surface. Reinforce the table when needed and avoid building up more material than the lightweight structure can comfortably handle.
13. Paint a Faux-Concrete Effect
Prefer less weight and less mess? Use several shades of gray paint and a sponge to imitate the cloudy variation of concrete. Begin with a medium-gray base, dab on lighter and darker shades, and blend while the paint remains workable. A matte protective topcoat completes the industrial look.
14. Make a DIY Terrazzo Table
Paint the table a light neutral shade and add irregular chips in several coordinating colors. You can paint each shape by hand or use vinyl decals for sharper edges. Pale pink, rust, mustard, charcoal, and muted blue create a believable terrazzo palette. Finish with a clear protective coat so the “chips” stay on the table rather than migrating onto your sleeves.
15. Add a Wood-Slat Tabletop
Cut thin wood strips to length and arrange them across the tabletop with narrow, even gaps. Stain the slats before installation to avoid pale seams. A wood-slat top adds warmth while preserving the LACK table’s simple proportions. Keep the additional top thin and light, and finish the perimeter with matching trim.
16. Create a Parquet Pattern
Use thin veneer strips or lightweight craft wood to form a herringbone, chevron, or basket-weave design. Plan the entire layout before applying adhesive, beginning from the center so the pattern remains balanced. Dark walnut tones create a traditional effect, while pale oak feels Scandinavian and airy.
17. Top It with Reclaimed-Wood Planks
Thin reclaimed boards can give the table a farmhouse or rustic-industrial identity. Sand rough edges, arrange the boards for the best color variation, and attach them to a lightweight backing panel rather than driving numerous fasteners into the hollow tabletop. Seal the wood so crumbs do not establish permanent residency between the boards.
18. Add Metallic Corner Details
Brass-look corner protectors, metallic vinyl strips, or painted trim can make a basic table appear more tailored. Use the accents sparingly: four corner caps or one narrow band around the tabletop may look more expensive than covering every edge in gold. Furniture, like jewelry, occasionally benefits from taking off one accessory.
19. Turn It into a Mirrored Side Table
Apply lightweight mirrored acrylic panels to the top, legs, or newly enclosed sides. Acrylic is generally easier to handle than glass and places less stress on the structure. Measure carefully, use a compatible adhesive, and align the panel edges precisely. The mirrored surface reflects light and visually reduces the table’s bulk.
20. Convert It into an Upholstered Ottoman
Add firm foam to the tabletop, wrap it with batting, and staple durable upholstery fabric to a separate wood panel secured over the table. Use the finished piece as a light-duty footstool or occasional seat only after reinforcing it appropriately. Bouclé, velvet, performance linen, and striped canvas can completely change its personality.
21. Sew a Full Table Skirt
A tailored or gathered fabric skirt is the lowest-tool transformation on the list. Create a removable cover that reaches the floor, then use the hidden space underneath for baskets, books, or charging cables. Stripes feel crisp and coastal, while a floral print creates the cozy look of an English-inspired bedroom.
22. Make a Coordinated Nesting Set
Pair the standard LACK side table with the smaller version that can slide underneath it. Paint both in related colors or cover their tops in complementary patterns. The smaller table can emerge when guests need another drink surface and retreat when the room needs more walking space.
23. Stack Two Tables for Open Storage
Combine two LACK tables to create a taller nightstand, printer station, or shelving unit. Shorten the legs of one table if necessary and connect the pieces through reinforced locations. The open area between the tops can hold baskets, folded blankets, or large art books without adding a complicated drawer system.
24. Build a Rolling Bar or Coffee Cart
Add a lightweight lower shelf, handles, and properly mounted casters to transform the table into a compact beverage cart. Reinforce the caster attachment points rather than screwing directly into unsupported hollow sections. Use the top for serving and the lower shelf for mugs, bottles, napkins, or coffee supplies.
25. Create a Hidden Pet Bed
Install a fitted cushion between the legs and add fabric panels or decorative slats around two or three sides. The tabletop remains available for a lamp or books while the space below becomes a sheltered sleeping nook. Select washable cushion covers, because pets are enthusiastic interior designers but indifferent housekeepers.
26. Turn It into a Raised Plant Stand
Paint the frame in a moisture-resistant finish and place a waterproof tray on top. Several tables at different heights can create a layered indoor plant display. Avoid allowing water to sit on the surface, and do not use an unprotected LACK table outdoors, where prolonged moisture can damage its manufactured construction.
27. Design a LEGO or Activity Table
Attach building-block baseplates or a removable activity board to the top, then add lightweight bins between the legs for supplies. Casters can make the station mobile when installed with suitable reinforcement. Rounded edge guards and washable finishes help the table survive both creative play and the occasional juice-box incident.
28. Build a Mini Play Kitchen
Paint faux burners on the tabletop, attach safe toy knobs to the front, and add a small rail for utensils. A bowl can become a pretend sink, while a fabric curtain conceals toy food underneath. Keep every component securely attached and age-appropriate, with no sharp hardware or loose pieces.
29. Add a Charging Drawer and Cable Station
Mount a lightweight under-table drawer or slim organizer beneath the top, keeping attachments within supported areas or on an added frame. Route charging cables through clips along the rear leg and place a cable box below. The result is a practical bedside table that hides the familiar nest of cords attempting to reproduce behind every outlet.
How to Make a LACK Table Hack Look Professionally Finished
The difference between a charming DIY and a project that looks accidentally unfinished usually comes down to edges. Trim wallpaper with a fresh blade. Sand cut molding. Fill visible nail holes. Caulk narrow gaps where appropriate. Paint the underside of added panels when it might be seen from a sofa or bed.
Repeating a detail elsewhere in the room also helps the table feel intentional. Match its brass trim to a lamp, repeat its paint color in a pillow, or pair a cane panel with a woven basket. The table does not need to match everything, but it should appear to be attending the same party.
Finally, allow finishes to cure before putting the table into service. Paint may feel dry while remaining vulnerable to dents, scratches, and rings. Follow the product instructions, then introduce books, lamps, plants, and drinks gradually rather than staging the entire room ten minutes after the last coat.
Practical Experience: What DIYers Learn from Their First LACK Table Hack
A first IKEA LACK table hack often begins with confidence. The table is inexpensive, the online inspiration looks effortless, and the supply list appears to contain only four items. How difficult could it be? Then the adhesive vinyl develops a bubble the approximate size of Nebraska, and the “20-minute project” becomes an evening seminar in patience.
The most useful lesson is that preparation takes longer than transformation. Cleaning, measuring, dry-fitting, and waiting for primer to cure may consume more time than the exciting decorative step. Skipping them feels efficient until the paint scratches when a coaster moves. A little boredom at the beginning usually prevents a great deal of colorful language later.
Measuring twice is not merely an old workshop saying. Peel-and-stick coverings, molding, acrylic panels, and wood veneer all expose inaccurate cuts. A difference of one-eighth inch may look tiny on a ruler but surprisingly theatrical at the corner of a table. Paper templates are enormously helpful, particularly for expensive materials or patterns that must align.
DIYers also learn that corners deserve their own strategy. Wrapping a tabletop is not exactly like wrapping a birthday present, although both activities can end with crumpled paper and denial. Practice the folds with inexpensive paper, make relief cuts only where necessary, and decide where seams will be least visible before exposing the adhesive.
Another common discovery is that one dramatic feature is usually enough. A fluted table with marble vinyl, gold corners, tassels, mirrored feet, and a terrazzo lower shelf may demonstrate admirable ambition, but it can also resemble a design showroom caught in a tornado. Choose a dominant idea, then allow smaller details to support it.
Hardware requires particular caution. Because the tabletop is lightweight and partly hollow, a screw does not automatically have solid material to grip. Heavy panels, casters, or shelves may need reinforcement blocks, an external frame, construction adhesive suitable for the materials, or a separate backing panel. Test every connection before trusting it with glassware, electronics, or a deeply suspicious cat.
Paint introduces another lesson: dry and cured are not the same thing. A surface may be touch-dry within hours but still soft enough to collect fingerprints or stick to objects. The safest approach is to follow the manufacturer’s curing instructions and leave the table lightly used during that period. Your lamp can survive on the floor for another day.
Many successful projects improve after the first attempt. A visible seam can be covered with trim. An uneven tile edge can receive a wood border. A color that feels too bright can be softened with a second coat in a calmer shade. DIY furniture is forgiving because almost every small mistake can become “the point where the design evolved.”
The most satisfying experience is seeing an ordinary table begin to fit a particular home. A leftover wallpaper sample can connect it to an accent wall. A scrap of cane can echo a headboard. Paint from a previous cabinet project can bring consistency to a small apartment. The finished table becomes more interesting not because it imitates expensive furniture perfectly, but because it reflects the room and the person who made it.
Conclusion
The best IKEA LACK table hacks balance imagination with the limitations of a lightweight, affordable piece. Surface makeovers such as paint, contact paper, stencils, and wallpaper are accessible starting points. Fluting, cane panels, tile, storage, casters, and upholstered conversions require more planning but can produce a genuinely custom result.
Whether you create a marble-look cube, a tiny bar cart, a pet nook, or a cheerful activity station, careful preparation will do more for the finished result than an overflowing toolbox. Start with one clear idea, choose materials that suit the table’s construction, and spend extra time making the edges neat. The LACK table may begin as a bargain, but it certainly does not have to look like one.
Note: Product designs, dimensions, colors, and availability may change. Review the current IKEA assembly and care information before modifying a table, and reinforce any project involving added weight, wheels, structural alterations, or use as seating.