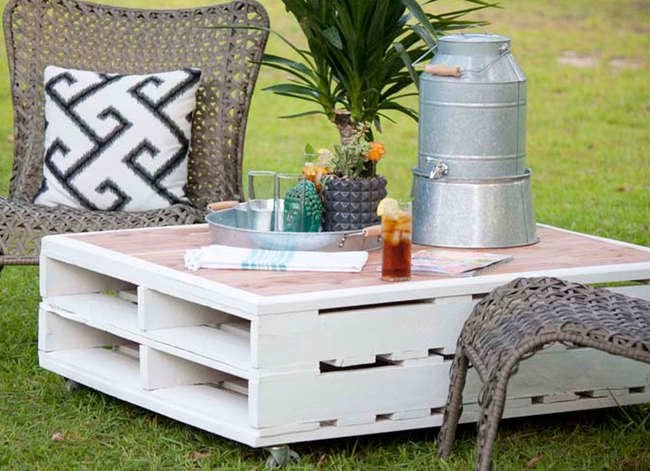
A patio without a table is like a grill without tongs: technically possible, but slightly chaotic. You need somewhere to set lemonade, burgers, books, sunscreen, flowerpots, board games, and that one mysterious screw left over from your last project. The good news? A stylish outdoor table does not have to cost more than your patio furniture, your weekend, and your will to live.
This guide explores 15 doable designs for a DIY patio table, inspired by the practical, homeowner-friendly spirit of Bob Vila-style outdoor projects. Whether you are a beginner with a drill and a dream or a weekend woodworker who owns more clamps than forks, these ideas can help you build a patio table that looks good, works hard, and survives more than one barbecue season.
We will cover outdoor dining tables, compact side tables, coffee tables, paver-top tables, cooler tables, foldable designs, and clever upcycled options. Along the way, you will find material tips, build notes, finishing advice, and real-world experience to help you avoid the classic DIY mistake: building something beautiful that wobbles every time someone reaches for the salsa.
Why Build a DIY Patio Table?
A DIY patio table gives you three things store-bought furniture often cannot: the exact size you need, the style you want, and the smug satisfaction of saying, “Thanks, I built it,” every time someone compliments it. More importantly, outdoor tables are among the most approachable DIY furniture projects because many designs use straight cuts, simple framing, and common materials such as cedar, pressure-treated lumber, deck boards, concrete pavers, or reclaimed wood.
Building your own patio table can also save money, especially if you already own basic tools or can reuse leftover lumber from a deck, fence, or shelving project. A small side table may take only an afternoon. A full outdoor dining table may require a weekend, a helper, and several cups of coffee, but it is still a realistic project for careful beginners.
Before You Build: Choose the Right Outdoor Materials
Outdoor furniture has a harder job than indoor furniture. It gets sunburned, rained on, splashed, bumped, and occasionally used as a landing pad for overconfident children. The material you choose matters.
Best Woods for a DIY Outdoor Table
Cedar is a favorite for patio tables because it is lightweight, attractive, and naturally resistant to decay and insects. Redwood, teak, cypress, white oak, and acacia are also strong options, though cost and availability vary by region. Pressure-treated lumber is budget-friendly and built for outdoor exposure, but it should be handled properly during cutting and sanding. For food-adjacent surfaces, many DIYers prefer cedar or another naturally durable wood for the tabletop and save pressure-treated boards for structural framing.
Hardware and Fasteners Matter
Use exterior-rated screws, deck screws, stainless steel screws, or coated pocket-hole screws made for outdoor use. Indoor screws can rust, stain the wood, and weaken over time. Waterproof wood glue can add strength, but screws, bolts, or pocket-hole joinery should do the main structural work.
Finish for Weather Protection
A patio table can be left to weather naturally, painted for personality, stained for warmth, or sealed for protection. If you want the table to last, apply an exterior-rated stain, paint, oil, or sealer according to the product directions. Reapply as needed. Outdoor furniture is not a “set it and forget it” situation; it is more like a houseplant with legs.
15 Doable Designs for a DIY Patio Table
1. The Classic Slatted Outdoor Dining Table
A slatted dining table is one of the most practical DIY patio table designs. The top is made from evenly spaced boards that allow rainwater to drain instead of pooling. The frame can be built from 2x4s, with legs made from 4x4s or doubled 2x4s for strength.
This design works well for families, outdoor dinners, and patios that need a true gathering spot. Keep the lines simple: rectangular frame, sturdy legs, center support, and tabletop boards running lengthwise. Leave small gaps between the slats for drainage and seasonal wood movement.
2. The Modern Farmhouse Patio Table
If your dream patio says “relaxed dinner party” but your budget says “please use the lumber aisle wisely,” a modern farmhouse table is a solid choice. Think chunky legs, clean lines, and a wide tabletop. You can use cedar for a lighter build or pressure-treated lumber for a budget-friendly structure.
The trick is proportion. Thick legs and a simple apron give the table a substantial look without complicated joinery. Add matching benches if you want a coordinated outdoor dining set. Bonus: benches tuck neatly under the table when not in use.
3. The 2×4 Outdoor Coffee Table
A 2×4 coffee table is a great first furniture project. It is affordable, sturdy, and forgiving. The design can be as simple as a box-style frame with a slatted top and lower shelf. Because 2x4s are easy to find and easy to cut, this project is beginner-friendly and adaptable.
Use it between outdoor sofas, lounge chairs, or Adirondack chairs. Sand the edges thoroughly so the table feels finished rather than “construction site chic.” A dark exterior stain can make basic lumber look surprisingly polished.
4. The Concrete Paver Side Table
For a patio side table that feels modern and sturdy, use a concrete paver as the top. Build a simple wooden base or stack painted pavers in a geometric shape. This design is ideal for small patios, balconies, or seating nooks where you only need space for a drink and a book.
Concrete pavers are heavy, which is good for stability but bad for toes. Make sure the base is level and strong enough to support the weight. Paint the paver for a playful look, or leave it natural for an industrial-modern vibe.
5. The Built-In Cooler Patio Table
A patio table with a built-in cooler is the outdoor furniture equivalent of a magic trick. Cut an opening in the center of the tabletop and fit a removable cooler, metal trough, or insulated insert. Fill it with ice and drinks during parties, then cover it with a fitted lid when not in use.
This design works best for larger dining tables or long bar-height tables. Plan the opening carefully before building the top, and make sure the cooler can be removed for cleaning. Nobody wants mystery water living under the lemonade.
6. The Outdoor Bar Table
A bar-height patio table creates a casual hangout zone for decks, pool areas, and small backyards. Build it taller than a dining table, usually around counter or bar height, and pair it with outdoor stools. Cedar is a popular choice because it is attractive and manageable for a weekend build.
Add a foot rail for comfort and extra stability. If the table will sit on a deck, use adjustable feet or levelers to reduce wobble. Outdoor bar tables should feel sturdy, not like they are auditioning for a carnival ride.
7. The Folding Patio Table
Small-space dwellers, this one is for you. A folding patio table can be stored in a shed, garage, or closet when not in use. It is especially useful for balconies, rental homes, or patios that double as play areas.
Use lightweight wood such as cedar, and choose durable outdoor-rated hinges. Keep the design simple: a fold-down top, crossed legs, or a wall-mounted drop-leaf style. The goal is convenience, not engineering a wooden transformer that requires a manual.
8. The Picnic-Style Patio Table
A picnic table is the classic backyard workhorse. It combines table and seating in one structure, making it excellent for families, cookouts, and casual outdoor meals. Traditional A-frame picnic tables are sturdy, familiar, and surprisingly comfortable when built with proper proportions.
For a more modern version, separate the benches from the table. This makes the pieces easier to move and more flexible for parties. Round over the edges of the seats and tabletop for comfort.
9. The Herringbone Tabletop Design
A herringbone tabletop looks fancy, but it is still doable if you are patient with measuring and cutting. The top uses angled boards arranged in a zigzag pattern over a strong base or plywood-backed frame. Cedar deck boards are a good choice because they are made for outdoor use and have a finished look.
This design is best for DIYers who are comfortable with a miter saw. The visual payoff is huge, but accuracy matters. Dry-fit the pattern before attaching anything permanently, because herringbone is not the place for “close enough.”
10. The Tile-Top Patio Table
A tile-top table is colorful, durable, and easy to wipe clean. You can build a wood frame and inset cement board or exterior-grade plywood as a base for tile. Use outdoor-rated tile, adhesive, grout, and sealer.
This design is perfect if you want a Mediterranean, coastal, or artsy patio look. Mosaic tile can hide small layout imperfections, while large tiles create a clean modern surface. Just make sure the structure underneath is strong, flat, and protected from moisture.
11. The Reclaimed Wood Patio Table
Reclaimed wood brings character that new lumber cannot fake. Old fence boards, deck boards, pallets, or salvaged planks can become a rustic patio table with plenty of personality. The key is inspection. Avoid boards that are rotten, oily, moldy, chemically treated in unknown ways, or full of hidden nails.
Use reclaimed boards for decorative tops or aprons, and pair them with new structural lumber if you need extra strength. Sand thoroughly, seal well, and embrace the imperfections. A few nail holes say “vintage.” A splinter the size of a toothpick says “lawsuit.”
12. The Round Patio Table
A round patio table softens the look of a deck or patio and makes conversation easier. You can build one using a circular tabletop cut from boards joined together or from an exterior-rated panel. A pedestal base or crossed-leg base keeps the design stable while leaving legroom.
Cutting a clean circle requires a jigsaw, router jig, or careful template work. If you are new to curves, practice on scrap first. Round tables are especially good for small spaces because there are no corners to bump into while carrying a plate of hot dogs.
13. The Cinder Block and Wood Table
Cinder blocks are inexpensive, strong, and wonderfully low-drama. Stack them as bases and add a thick wooden top for an easy industrial-style patio table. You can paint the blocks, leave them raw, or use the openings for small planters.
This design is great for renters because it can be disassembled. However, it is heavy, so build it where you want it. Add rubber pads or outdoor adhesive strips between the blocks and wood top to reduce shifting.
14. The Narrow Console Table for the Patio
A narrow outdoor console table is useful behind a sofa, along a railing, or beside a grill station. It can hold plants, serving trays, lanterns, or a Bluetooth speaker. Build it with slim legs, a long top, and a lower shelf for storage.
This is a smart project for leftover boards because it does not require much lumber. Make it counter height if you plan to use it for serving food. Add hooks on the side for towels, grilling tools, or small hanging planters.
15. The Fire Pit Cover Table
If you have a round or square fire pit, a removable tabletop cover can turn it into a functional coffee table when the fire is out. Build a lightweight wood cover that fits securely over the pit, then finish it to match your outdoor seating.
Safety comes first: never cover a hot fire pit, and do not use combustible materials near active flames. This design is for converting unused space during the day, not for multitasking with fire. Fire is dramatic enough without inviting furniture into the plot.
Planning Your DIY Patio Table Build
Measure the Space First
Before buying lumber, measure your patio, deck, or balcony. Leave enough room to pull out chairs and walk around the table. A dining table that technically fits but traps guests against a railing is not a dining table; it is a polite obstacle course.
Pick the Right Height
Standard dining tables are usually around 28 to 30 inches high. Coffee tables often range from 16 to 18 inches high. Bar tables are taller, commonly around 40 to 42 inches. Match the table height to the seating you already own.
Control Wobble From the Start
Most table wobble comes from uneven legs, weak joints, or an out-of-square frame. Build on a flat surface, check diagonals for square, and clamp parts before driving screws. Add cross braces, aprons, or lower shelves if the table needs more rigidity.
Sand Like You Mean It
Outdoor furniture still touches human skin. Sand the top, corners, edges, and leg areas carefully. Start with a medium grit and finish with a smoother grit before staining or sealing. Rounded edges look better and feel safer.
Finishing Tips for a Patio Table That Lasts
Even the best DIY patio table needs protection. Sun breaks down finishes. Rain encourages swelling and rot. Temperature changes make wood move. A good finish slows the damage and keeps your project looking intentional instead of abandoned.
- Use exterior products: Interior paint and stain are not built for weather exposure.
- Seal end grain: Board ends absorb moisture quickly, so coat them well.
- Lift the legs: Rubber feet or furniture glides help keep wood from sitting directly in water.
- Store or cover: A furniture cover can extend the life of your table dramatically.
- Refresh yearly: Clean, inspect, and recoat when the finish starts looking tired.
Safety Notes for Outdoor Table Projects
Wear eye protection when cutting, drilling, or sanding. Use a dust mask when sanding wood, especially treated lumber. Cut pressure-treated wood outdoors or in a well-ventilated area, and clean up sawdust and scraps properly. Do not burn treated lumber. If your table will be used for meals, choose finishes that are appropriate for tabletops once fully cured, and always follow the manufacturer’s instructions.
Also, be honest about your tools and skill level. A simple 2×4 coffee table is a better first project than a curved pedestal table with hidden joinery and emotional consequences. Confidence is good. Overconfidence is how people end up texting their neighbor, “Do you know how to unjam a miter saw?”
Experience-Based Notes: What You Learn After Building a Patio Table
After you build a patio table, you start noticing things furniture stores rarely mention. The first is weight. A table that feels easy to move in the garage may become a wooden boulder once it is fully assembled and carried across a yard. If you build a large dining table, assemble it near its final location or recruit a helper. Your back will thank you, and so will your dignity.
The second lesson is that outdoor floors are rarely level. Deck boards slope for drainage. Paver patios settle. Concrete pads have tiny waves that become very obvious when a table leg starts tapping like an impatient drummer. Adjustable feet are a small upgrade that can save a lot of irritation. If you do not want to install levelers, keep a few clear rubber pads on hand.
The third lesson is that wood movement is real. A tightly fitted tabletop may look beautiful on build day, then cup, swell, or crack after a few rounds of rain and sun. Leave small gaps between slats, use the correct fasteners, and avoid trapping water. Outdoor furniture needs breathing room, not a sealed wooden panic room.
Another experience: stain colors look different outside. A stain that appears rich and warm in the garage can look much darker on the patio or strangely orange in full sun. Test the finish on scrap wood from the same board batch before coating the whole table. This one step prevents the classic “why is my elegant cedar table pumpkin-colored?” moment.
When building for real use, think about how people behave, not how catalog photos look. People put their feet on coffee table rails. Kids lean on edges. Guests scoot chairs aggressively. Someone will sit on the table even if you swear they will not. Strong joinery, bracing, and sensible proportions matter more than a delicate design that looks good for one afternoon.
Storage also matters. If your climate has heavy rain, snow, strong sun, or salty coastal air, plan for protection. A table cover, covered porch, or seasonal storage spot can double the useful life of your work. If storage is limited, build a table that can be moved easily or make the top removable.
Finally, the best DIY patio table is the one you will actually finish. Choose a design that matches your weekend, your tools, and your patience. A simple table completed and used is better than a complicated masterpiece that lives half-built in the garage until spiders claim it as an heirloom.
Conclusion
A DIY patio table is one of the most rewarding outdoor projects because it combines function, style, and achievable craftsmanship. From a simple 2×4 coffee table to a built-in cooler dining table, there is a design for almost every patio size, budget, and skill level. Start with durable materials, use exterior-rated hardware, protect the finish, and build for real outdoor life. Your future self will appreciate having a sturdy place for dinner plates, flowerpots, cold drinks, and the occasional victory snack after mowing the lawn.
Whether you choose cedar, pressure-treated lumber, concrete pavers, tile, reclaimed wood, or a mix of materials, the key is to keep the design practical. Measure carefully, sand generously, brace wisely, and finish patiently. Then invite people over and pretend you are totally casual about the fact that everyone is admiring your handiwork.